React Native Taxi App
July 23, 2021
In this tutorial, we will build a Taxi App for both iOS & Android using React Native CLI. Also, we’re going to dive into Unit Testing our entire app using Jest + React Testing Library. We will use AWS with Amplify for authentication, database, and AppSync for GraphQL API for the back-end.
Part 1. Google Maps, Geolocation & Unit Test
Environment setup
First, make sure you have the development environment ready before you start. I’m using a macOS Laptop with two iPhones: iPhone 12 & iPhone SE 2020. Although it isn’t necessary to have an actual device to test the App, you can use an Emulator if you don’t have an Android/iPhone, but it’s recommended that you test the App on a real device.
I’m using React Native version 0.64, be sure you have the same version to avoid compatibility issues using the main libraries like react-native-maps and others. I will try to keep the tutorial up to date with the major releases on React Native CLI.
Follow this link to install the local environment. Let’s go!!
Create the App
Let’s create the app using npx command
npx react-native init taxiApp --version 0.64.2Create an src folder and move the App.js file into that location. In the end, you should have ./src/App.js. We aren’t using TypeScript (TS) for this project, so remove everything related to TS and convert TypeScript App function into a regular JavaScript function.
import React from "react"
import { SafeAreaView, StatusBar, StyleSheet, Text, View } from "react-native"

const App = () => {
  return (
    <SafeAreaView>
      <StatusBar barStyle="dark-content" />
      <View style={styles.sectionContainer}>
        <Text style={styles.sectionTitle}>Welcome to Taxi App</Text>
      </View>
    </SafeAreaView>
  )
}

const styles = StyleSheet.create({
  sectionContainer: {
    marginTop: 32,
    paddingHorizontal: 24,
  },
  sectionTitle: {
    fontSize: 24,
    fontWeight: "600",
  },
  sectionDescription: {
    marginTop: 8,
    fontSize: 18,
    fontWeight: "400",
  },
})

export default App
I have placed a temporary Welcome to Taxi App message with some styles using StyleSheet object from React Native, which is nice, but this will be temporary because we will move into Styled Components soon.
Because I moved App.js into the src folder, we have to update App.js to import the new location inside the main index.js.
From
import App from "./App"To
import App from "./src/App"Run in the Emulator
First we will need to start Metro. To start Metro, run npx react-native start inside your React Native project folder:
npx react-native startLet Metro Bundler run in its own terminal. Open a new terminal inside your React Native project folder. Run the following:
npx react-native run-iosIf everything is set up correctly, you should see your new app running in your iPhone emulator shortly.
Install React Native Maps
The default library to use for working with Maps in React Native is react-native-maps, and we’re going to use that next.
npm install react-native-maps --save-exactWe will use Google Maps instead of Apple Maps because Apple Maps only works out of the box for iOS devices. To continue, we will need to have an API key for Android SDK & the same for iOS SDK. You need to create a Google billing acount, so click the link and create an account.
Google Billing Account
Once you created an account with Google Cloud, you will need to create a New Project. Inside the New Project, we will create API & Services for accessing Maps SDK for Android, Maps SDK for iOS, and more.
- Create a new Project inside console.cloud.google.com
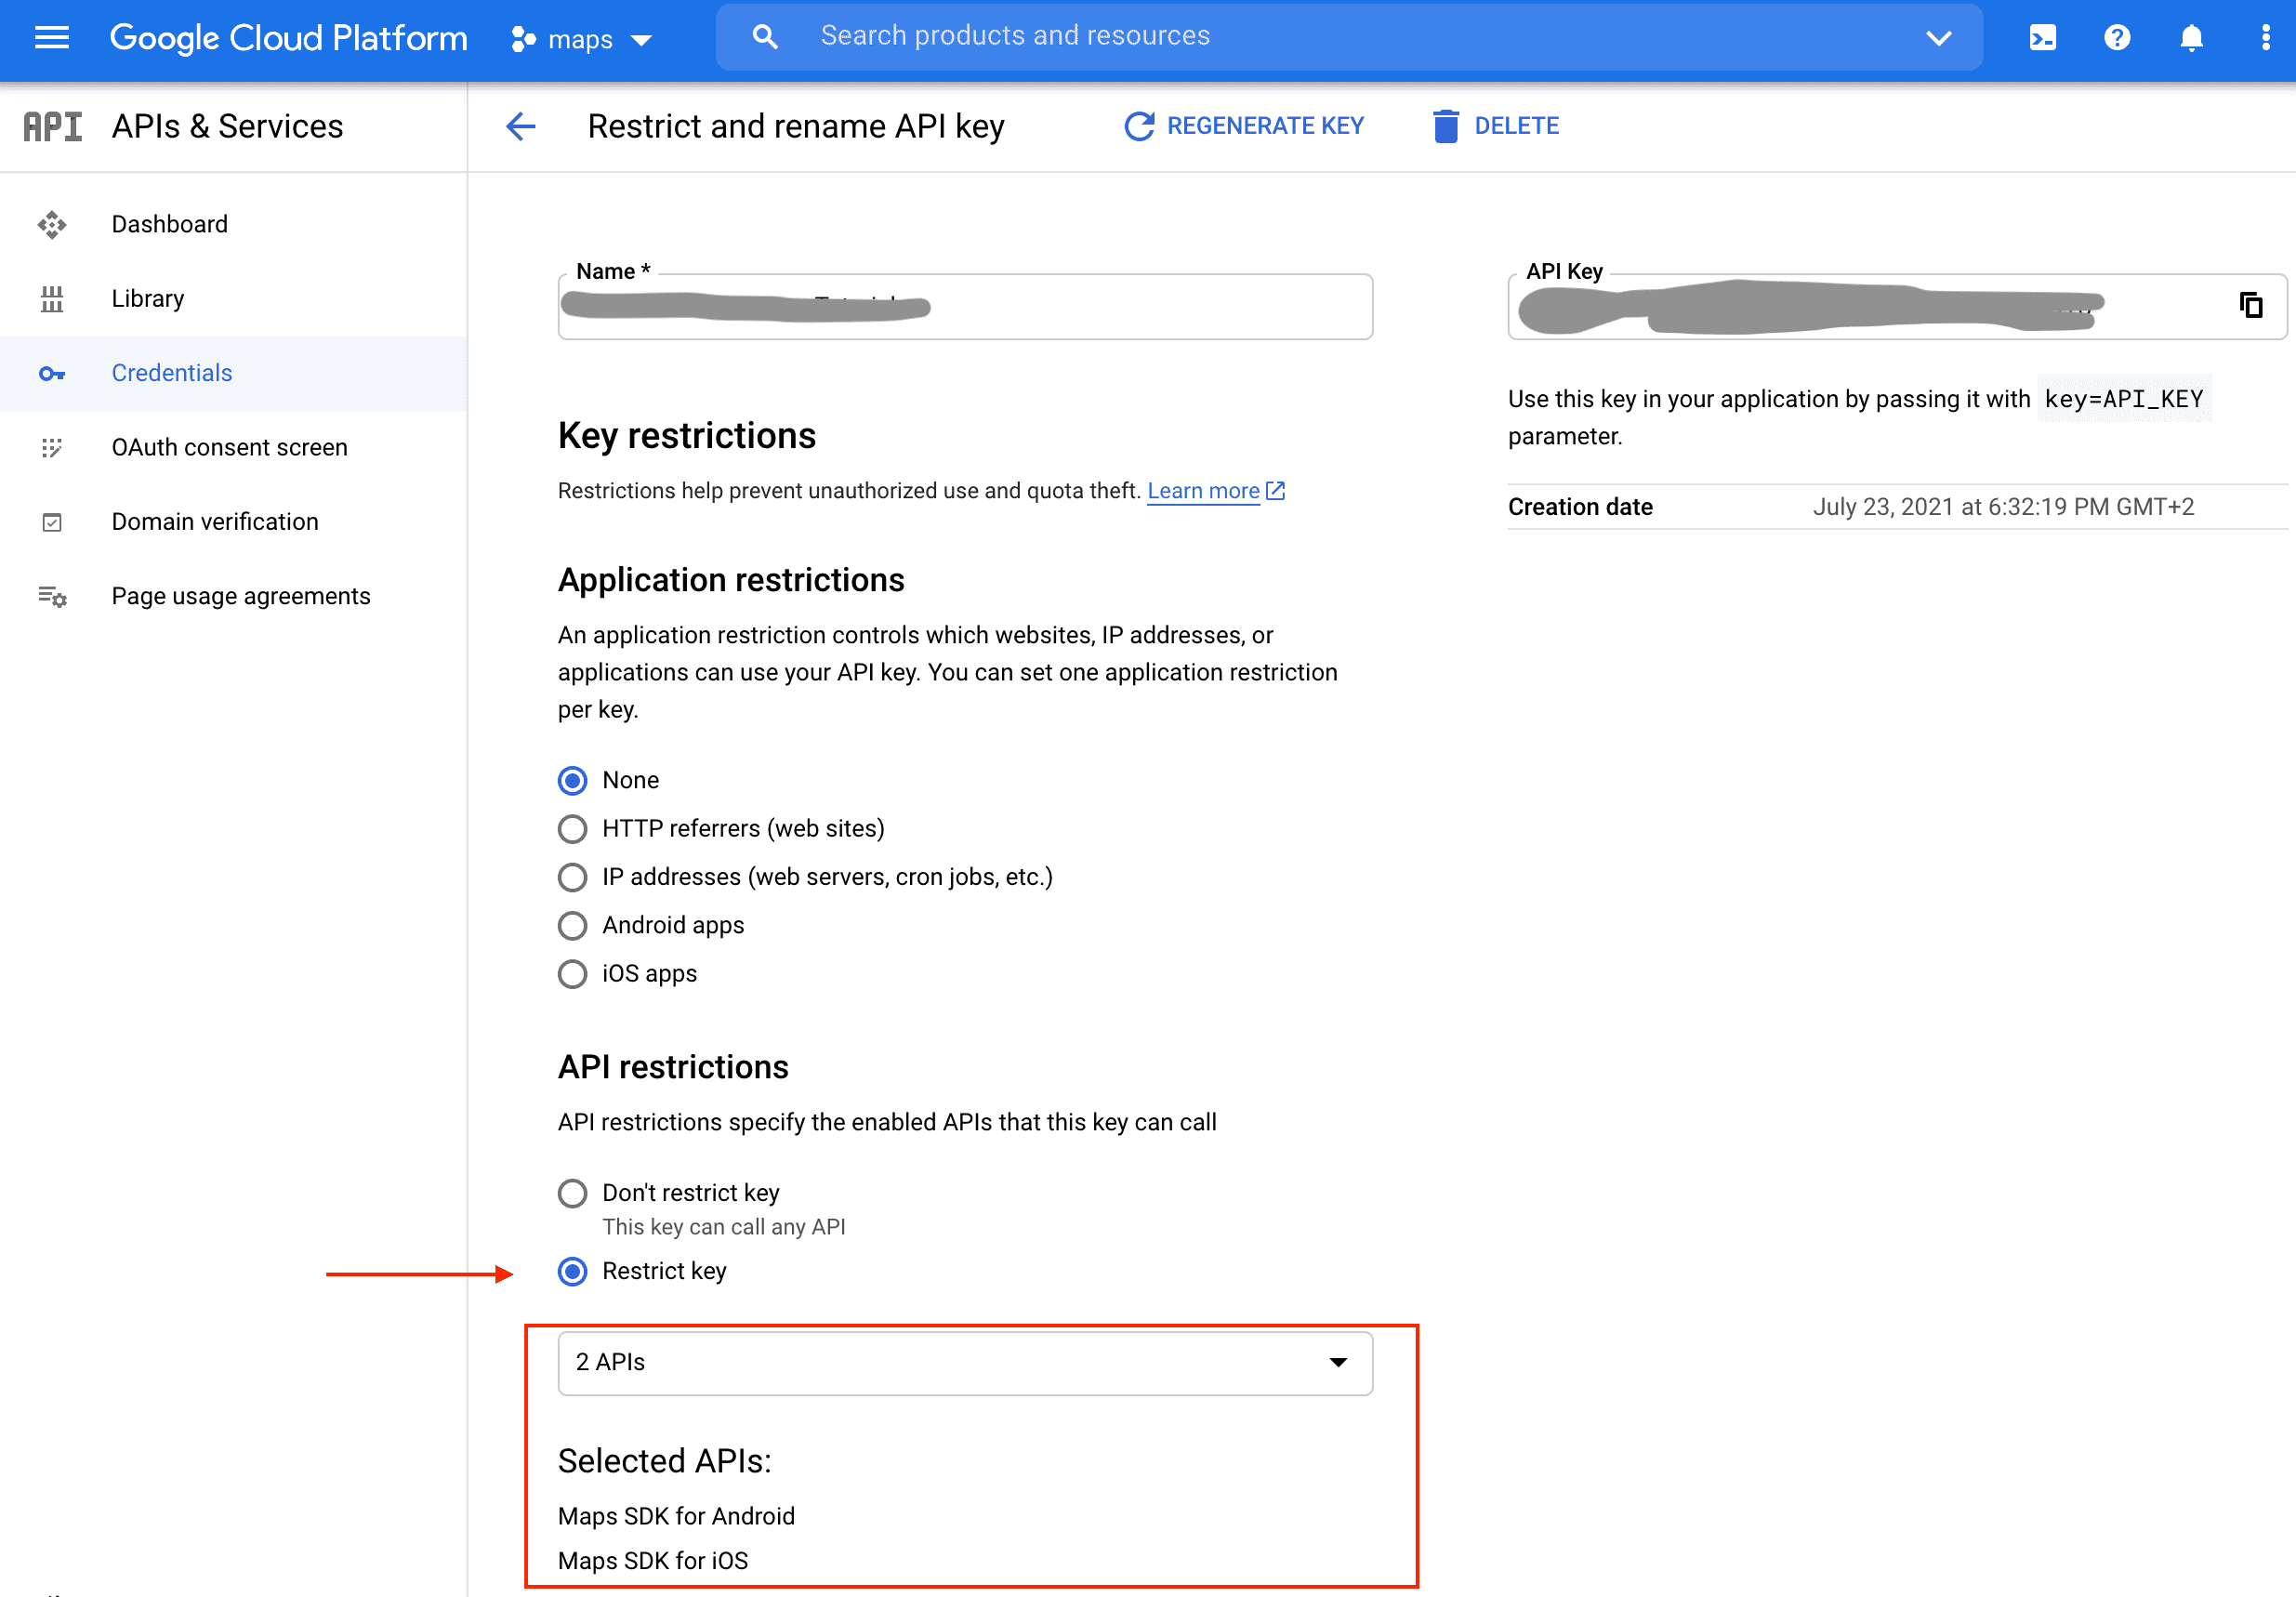
- Click API & Services > Credentials.
- Click on + CREATE CREDENTIALS. It will immediately give you an API key. That’s the one we’re going to use to set Google Maps on both iOS and Android.
- Click on the recently created credentials to restrict the key. Search for the API restrictions section. You will see an option to Restrict key. There make sure you select Maps SDK for Android and Maps SDK for iOS.
- Click Save
Build configuration on iOS
Set the usage description property
The app’s Info.plist file must contain a NSLocationWhenInUseUsageDescription with a user-facing purpose string explaining clearly and completely why your app needs the location, otherwise Apple will reject your app submission.
Inside your ./ios/taxiApp/Info.plist, make sure you have this:
...
<key>NSLocationWhenInUseUsageDescription</key>
<string>In order to work we need you to grant location access</string>
...
Enabling Google Maps in iOS
If you want to enable Google Maps on iOS, copy the Google API key and edit your AppDelegate.m as follows:
+ #import <GoogleMaps/GoogleMaps.h>

@implementation AppDelegate
...

- (BOOL)application:(UIApplication *)application didFinishLaunchingWithOptions:(NSDictionary *)launchOptions
{
+  [GMSServices provideAPIKey:@"_YOUR_API_KEY_"]; // add this line using the api key obtained from Google Console
...
The [GMSServices provideAPIKey] should be the first call of the method.
Add the following to your Podfile above the config = use_native_modules!:
# React Native Maps dependencies
rn_maps_path = '../node_modules/react-native-maps'
pod 'react-native-google-maps', :path => rn_maps_path
pod 'GoogleMaps'
pod 'Google-Maps-iOS-Utils'
Now, we’re going to build for iOS using CocoaPods. After installing the npm package, we need to install the pod.
npx pod-installBuild configuration on Android
Configure Google Play Services. Inside android/build.gradle add this two lines:
ext {
        buildToolsVersion = "29.0.3"
        minSdkVersion = 21
        compileSdkVersion = 29
        targetSdkVersion = 29
        ndkVersion = "20.1.5948944"
        playServicesVersion = "17.0.0"    // 👈
        androidMapsUtilsVersion = "2.2.0" // 👈
    }
Specify your Google Maps API key. Add your API key to your manifest file (android/app/src/main/AndroidManifest.xml):
<application>
   <!-- You will only need to add this meta-data tag, but make sure it's a child of application -->
   <meta-data
     android:name="com.google.android.geo.API_KEY"
     android:value="Your Google maps API Key Here"/>

   <!-- You will also only need to add this uses-library tag -->
   <uses-library android:name="org.apache.http.legacy" android:required="false"/>
</application>
Start using React Native Maps
Open the App.js file and replace the content with the following code. The purpose is to show Google Map covering the device’s entire screen. We’re adding new styles for that:
import React from "react"
import { SafeAreaView, StatusBar, StyleSheet } from "react-native"
import MapView, { PROVIDER_GOOGLE } from "react-native-maps"
const App = () => {
return (
<SafeAreaView style={styles.container}>
<StatusBar barStyle="dark-content" />
<MapView
style={styles.map}
provider={PROVIDER_GOOGLE}
initialRegion={{
latitude: 57.709127,
longitude: 11.934746,
latitudeDelta: 0.0922,
longitudeDelta: 0.0421,
}}
/>
</SafeAreaView>
)
}
const styles = StyleSheet.create({
container: {
...StyleSheet.absoluteFillObject,
alignItems: "center",
},
map: {
...StyleSheet.absoluteFillObject,
},
})
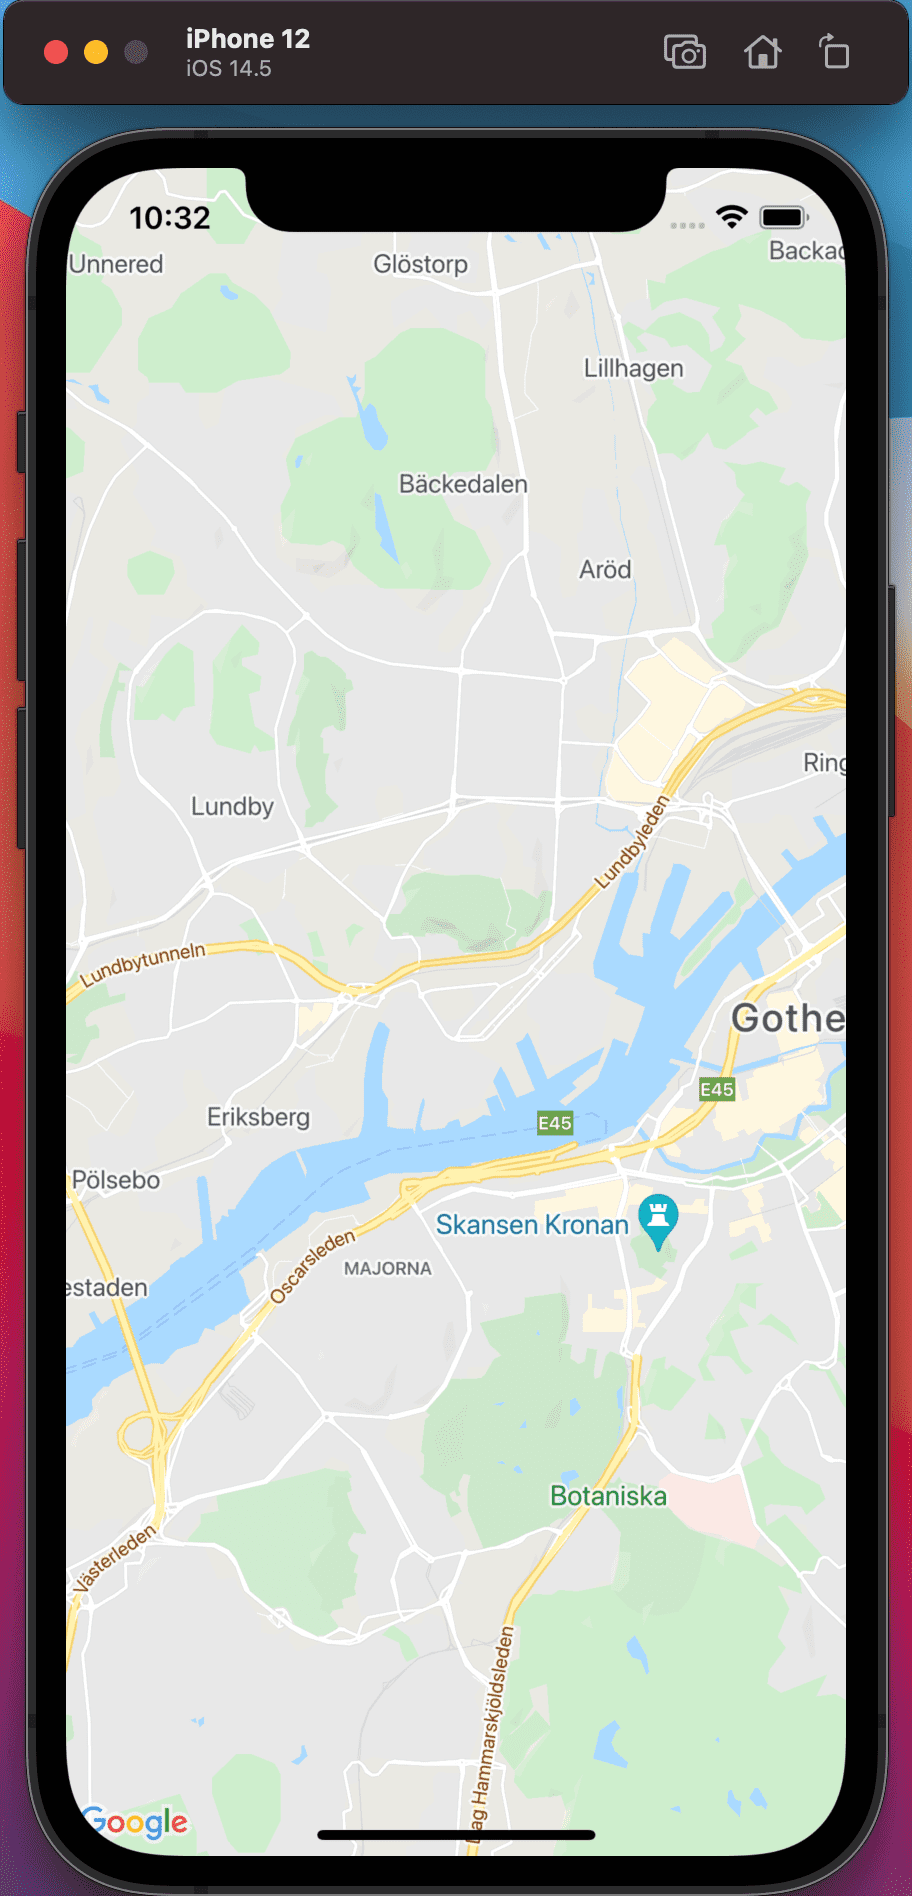
export default AppIf you’re running the App on the Emulator, you should see something like this:
Show user location
We will ask for location permission from the user to show the user’s location on the map. For that, we’re going to use the package react-native-permissions. You can follow the instructions on how to set up for iOS & Android here.
npm install --save react-native-permissions@3.0.1For iOS setup you have to open the Podfile inside ios folder and add next lines of code:
# React Native Permissions
permissions_path = '../node_modules/react-native-permissions/ios'
pod 'Permission-LocationWhenInUse', :path => "#{permissions_path}/LocationWhenInUse"
Previously we already added inside Info.plist next lines, but you can double-check:
<key>NSLocationWhenInUseUsageDescription</key>
<string>In order to work we need you to grant location access</string>
Now using Cocoa Pods install the dependencies for finishing the process for ios.
npx pod-installFor Android you only have to update the android/app/src/main/AndroidManifest.xml file.
<uses-permission android:name="android.permission.ACCESS_COARSE_LOCATION" />
<uses-permission android:name="android.permission.ACCESS_FINE_LOCATION" />
Now, lets use react native permissions to show user location. Inside your App.js file add next lines:
import React, { useEffect } from "react"
import { SafeAreaView, StatusBar, StyleSheet } from "react-native"
import MapView, { PROVIDER_GOOGLE } from "react-native-maps"
import { check, request, PERMISSIONS, RESULTS } from "react-native-permissions"

const App = () => {
  const handleLocationPermission = async () => {
    let permissionCheck = ""
    if (Platform.OS === "ios") {
      permissionCheck = await check(PERMISSIONS.IOS.LOCATION_WHEN_IN_USE)

      if (permissionCheck === RESULTS.DENIED) {
        const permissionRequest = await request(
          PERMISSIONS.IOS.LOCATION_WHEN_IN_USE
        )
        permissionRequest === RESULTS.GRANTED
          ? console.warn("Location permission granted.")
          : console.warn("Location perrmission denied.")
      }
    }

    if (Platform.OS === "android") {
      permissionCheck = await check(PERMISSIONS.ANDROID.ACCESS_FINE_LOCATION)

      if (permissionCheck === RESULTS.DENIED) {
        const permissionRequest = await request(
          PERMISSIONS.ANDROID.ACCESS_FINE_LOCATION
        )
        permissionRequest === RESULTS.GRANTED
          ? console.warn("Location permission granted.")
          : console.warn("Location perrmission denied.")
      }
    }
  }

  useEffect(() => {
    handleLocationPermission()
  }, [])

  return (
    <SafeAreaView style={styles.container}>
      <StatusBar barStyle="dark-content" />
      <MapView
        style={styles.map}
        provider={PROVIDER_GOOGLE}
        initialRegion={{
          latitude: 57.709127,
          longitude: 11.934746,
          latitudeDelta: 0.0922,
          longitudeDelta: 0.0421,
        }}
        showsUserLocation={true}
      />
    </SafeAreaView>
  )
}

const styles = StyleSheet.create({
  container: {
    ...StyleSheet.absoluteFillObject,
    alignItems: "center",
  },
  map: {
    ...StyleSheet.absoluteFillObject,
  },
})

export default App
If you run the App using the iOS Emulator you will see a Popup windows asking for permission, that you have to approve.
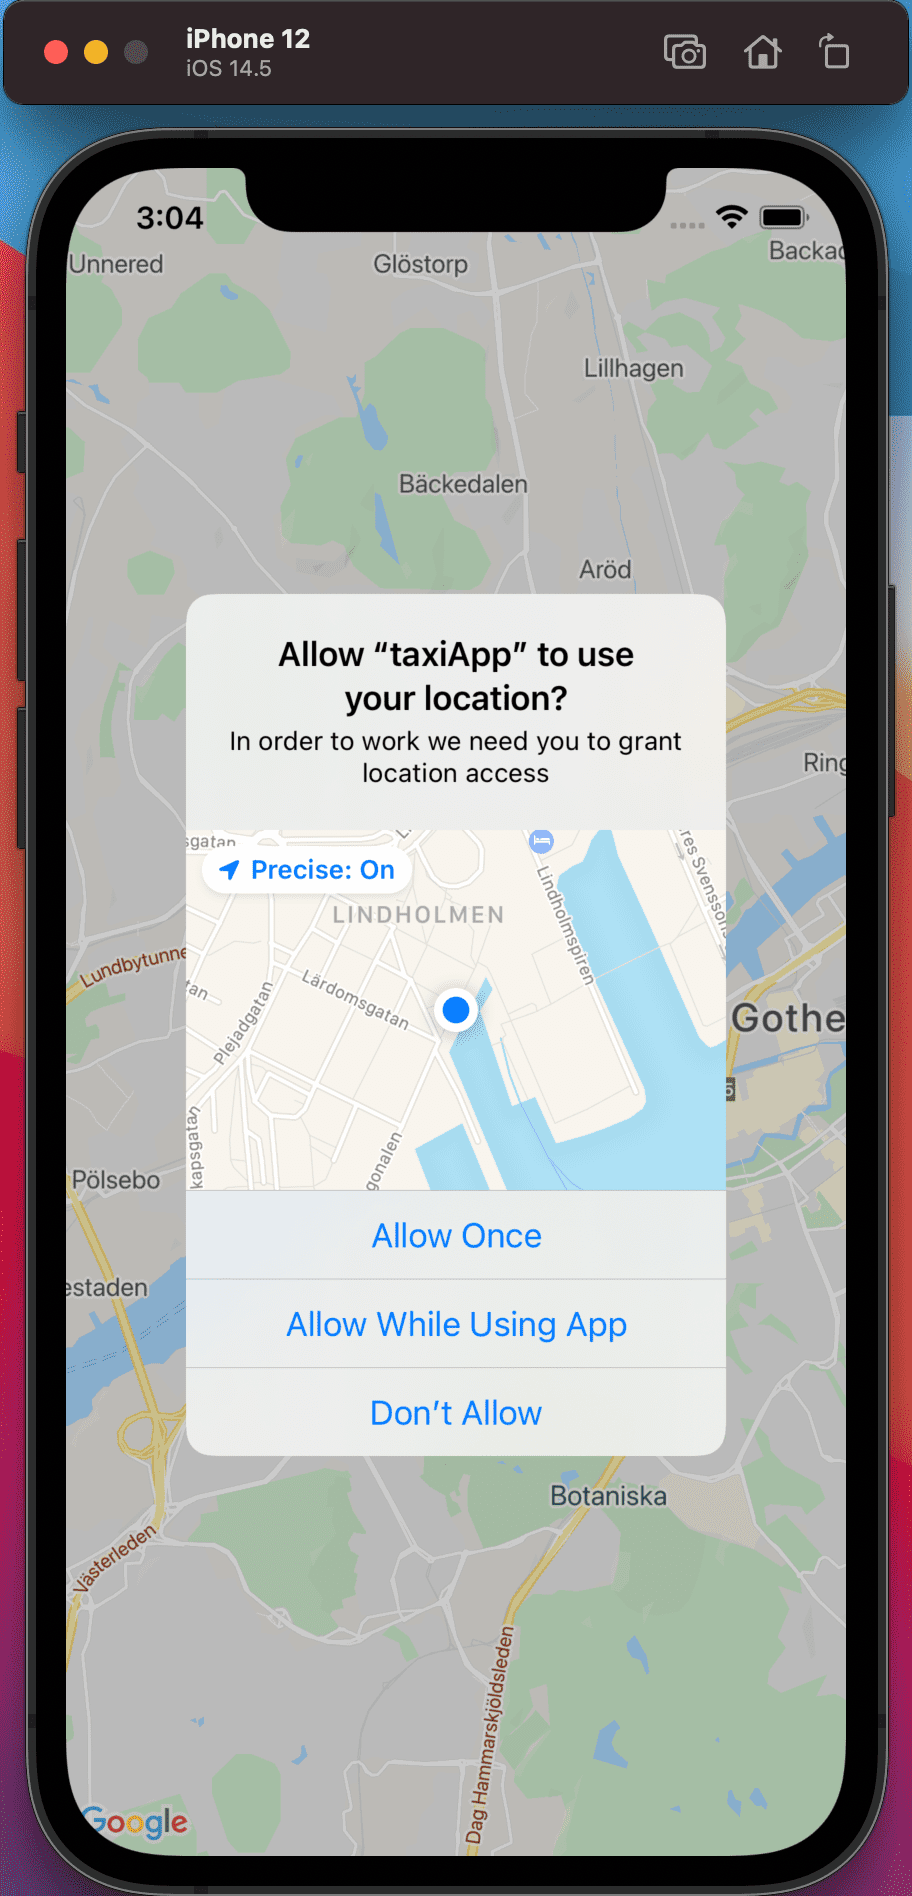
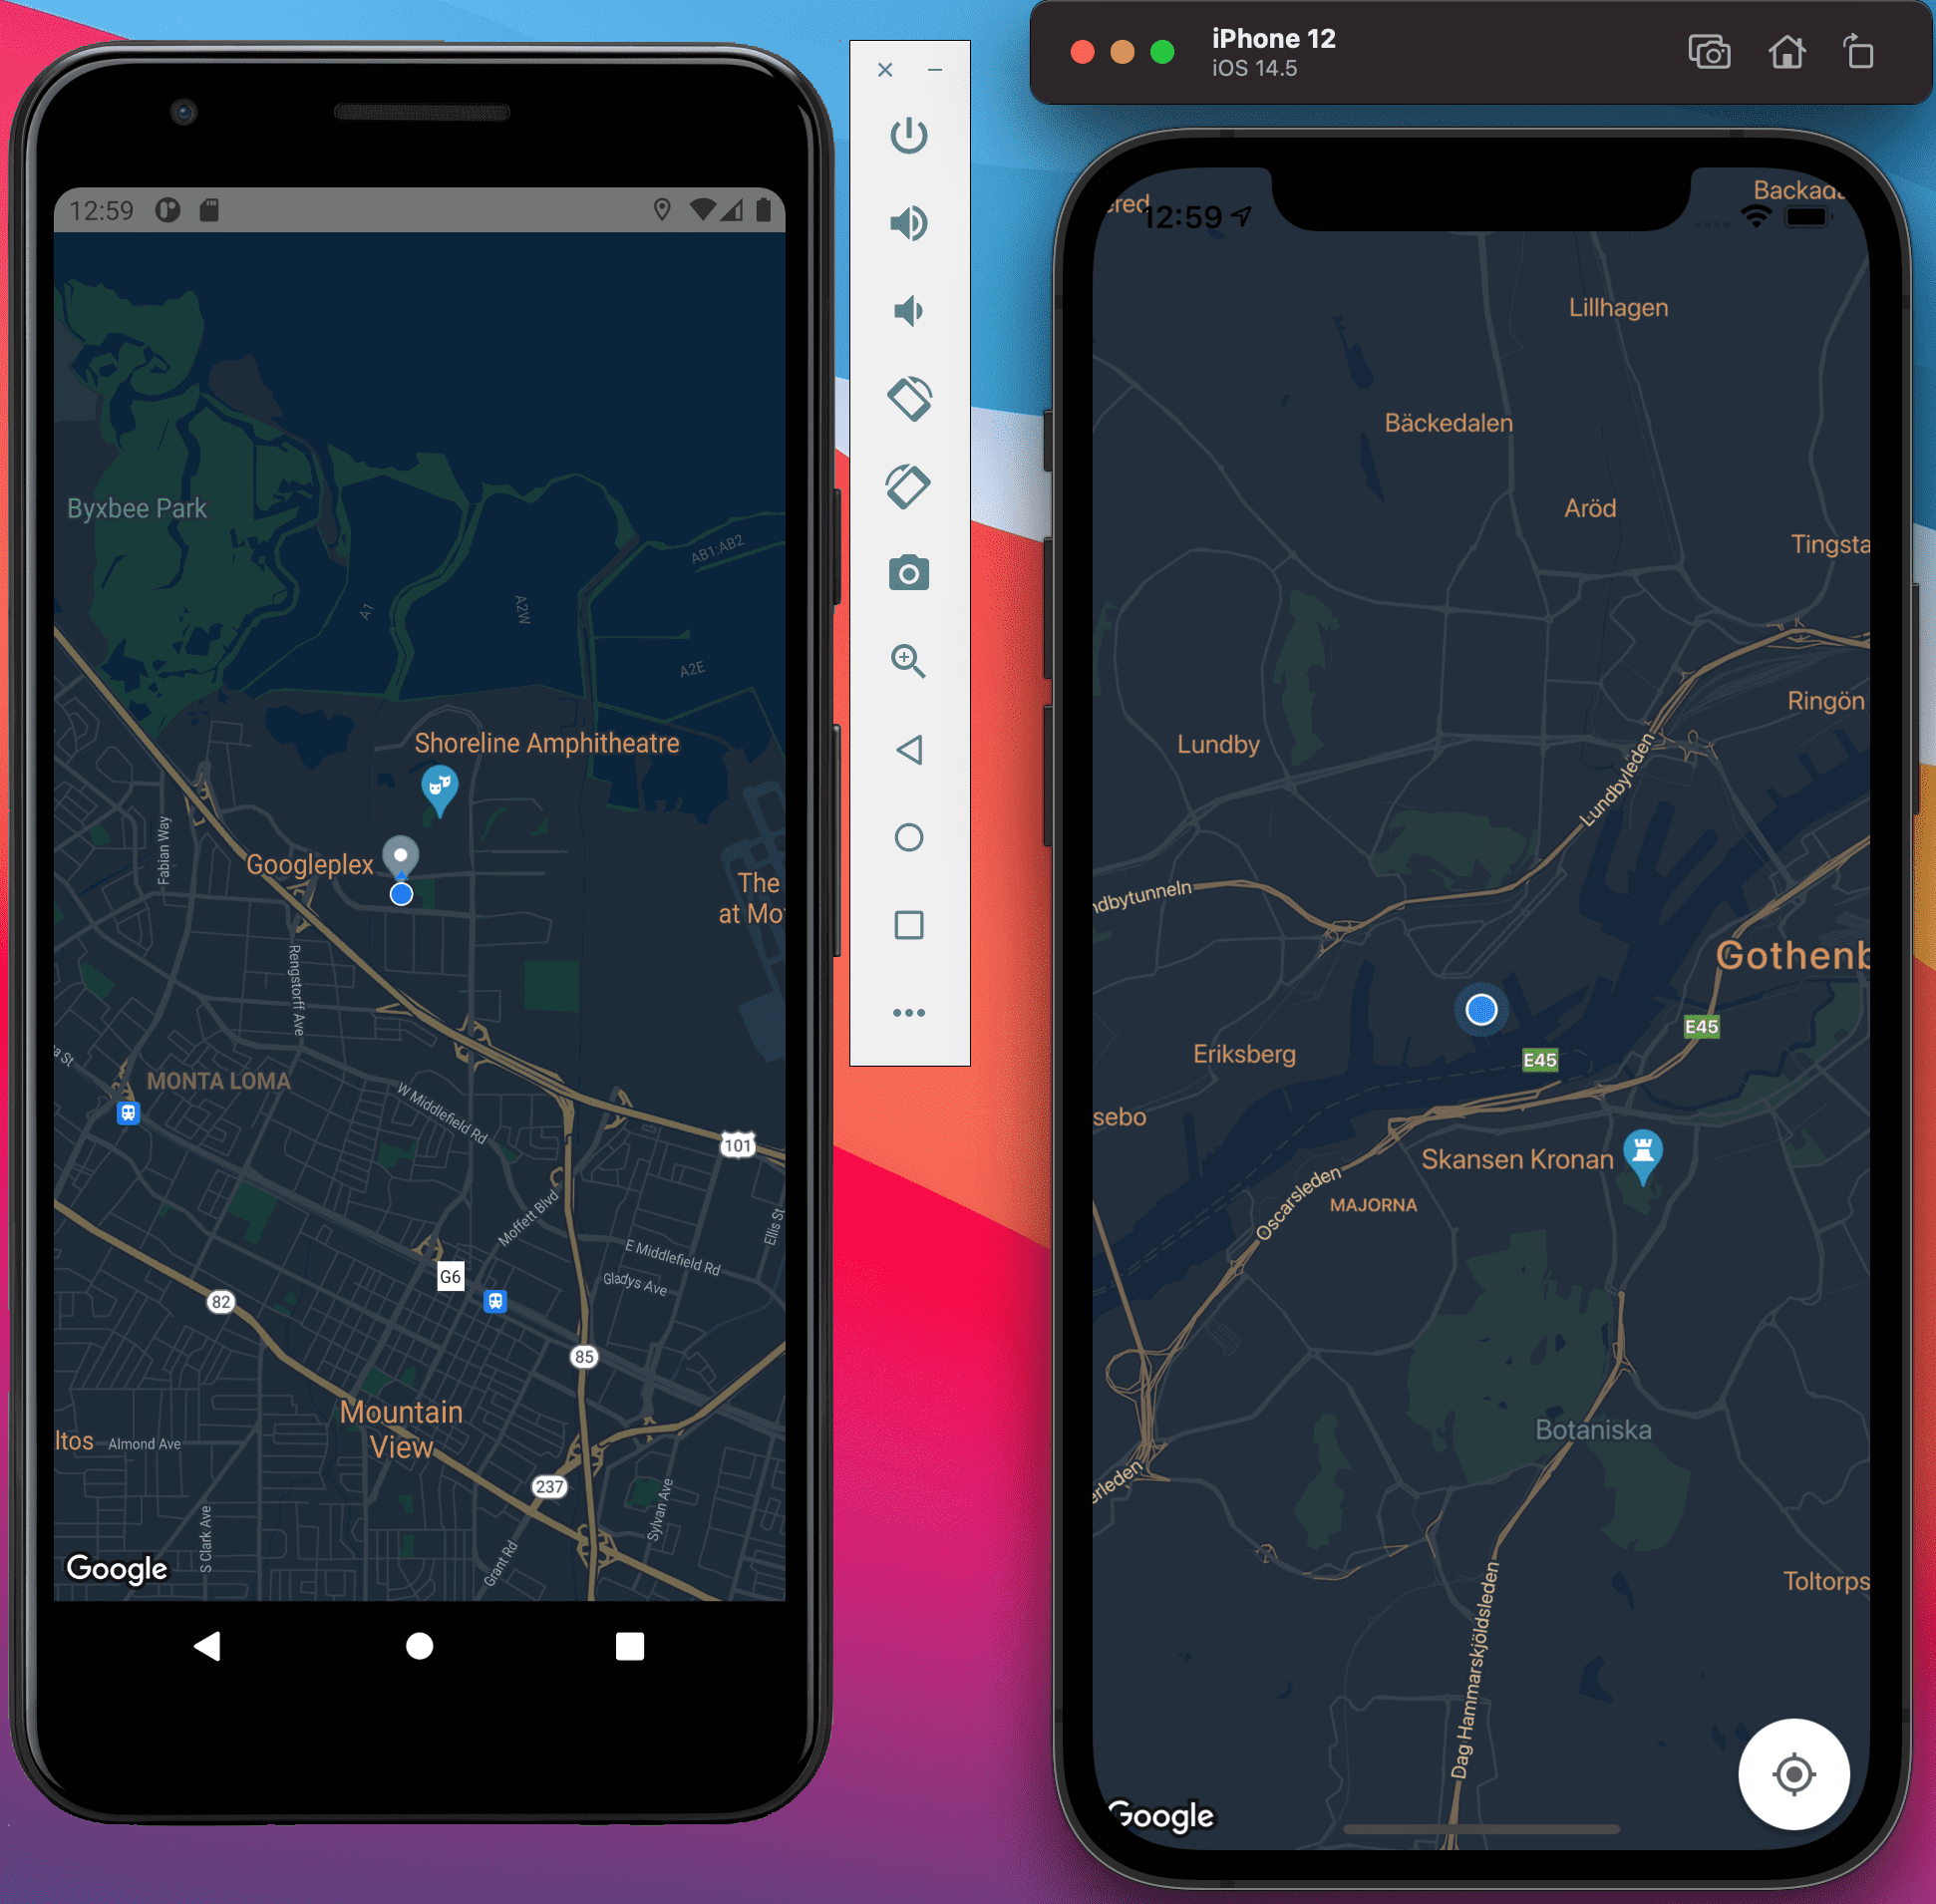
Once you approve, you should see a blue circle indicating your current location. If isn’t that the case, perhaps it’s because your Emulator isn’t using a Custom Location, and you have to update that. For that, go into the Emulator menu and follow this:
- Click on Features > Location > Custom Location
- Type this location: Latitude: 57,705871 & Longitude: 11,938823
This location is based on the map initialRegion, which in the code above its:
initialRegion={{
    latitude: 57.709127,
    longitude: 11.934746,
    latitudeDelta: 0.0922,
    longitudeDelta: 0.0421,
}}
You can see that my Custom Location is inside my initial map region, which is the city of Gothenburg, Sweden.
Track user Location
Previously, we only show the user’s current location, but we need to track the user location continuously when the user change position. For that, we’re going to use react-native-geolocation-service.
npm install react-native-geolocation-service@5.2.0Setup
You can follow the more detail guide on their documentation. We already setup Location Permission for both iOS & Android. I the case for iOS we will run:
npx pod-installLet’s update our App.js component to track the user location using Geolocation.
import React, { useEffect, useState } from "react"
import { SafeAreaView, StatusBar, StyleSheet } from "react-native"
import MapView, { PROVIDER_GOOGLE } from "react-native-maps"
import { check, request, PERMISSIONS, RESULTS } from "react-native-permissions"
import Geolocation from "react-native-geolocation-service"

const App = () => {
  const [location, setLocation] = useState(null)

  const handleLocationPermission = async () => {
    let permissionCheck = ""
    if (Platform.OS === "ios") {
      permissionCheck = await check(PERMISSIONS.IOS.LOCATION_WHEN_IN_USE)

      if (permissionCheck === RESULTS.DENIED) {
        const permissionRequest = await request(
          PERMISSIONS.IOS.LOCATION_WHEN_IN_USE
        )
        permissionRequest === RESULTS.GRANTED
          ? console.warn("Location permission granted.")
          : console.warn("Location perrmission denied.")
      }
    }

    if (Platform.OS === "android") {
      permissionCheck = await check(PERMISSIONS.ANDROID.ACCESS_FINE_LOCATION)

      if (permissionCheck === RESULTS.DENIED) {
        const permissionRequest = await request(
          PERMISSIONS.ANDROID.ACCESS_FINE_LOCATION
        )
        permissionRequest === RESULTS.GRANTED
          ? console.warn("Location permission granted.")
          : console.warn("Location perrmission denied.")
      }
    }
  }

  useEffect(() => {
    handleLocationPermission()
  }, [])

  useEffect(() => {
    Geolocation.getCurrentPosition(
      position => {
        const { latitude, longitude } = position.coords
        setLocation({ latitude, longitude })
      },
      error => {
        console.log(error.code, error.message)
      },
      { enableHighAccuracy: true, timeout: 15000, maximumAge: 10000 }
    )
  }, [])

  return (
    <SafeAreaView style={styles.container}>
      <StatusBar barStyle="dark-content" />
      {location && (
        <MapView
          style={styles.map}
          provider={PROVIDER_GOOGLE}
          initialRegion={{
            latitude: location.latitude,
            longitude: location.longitude,
            latitudeDelta: 0.0922,
            longitudeDelta: 0.0421,
          }}
          showsUserLocation={true}
        />
      )}
    </SafeAreaView>
  )
}

const styles = StyleSheet.create({
  container: {
    ...StyleSheet.absoluteFillObject,
    alignItems: "center",
  },
  map: {
    ...StyleSheet.absoluteFillObject,
  },
})

export default App
To resume.
- Added local state using useState
const [location, setLocation] = useState(null). - Using useEffect when component mount we call Geolocation service and update the location state.
- Added a condition to show the
<MapView />component only if location state isn’t null.
Add Custom Style & Props to MapView
We can change the colors and general look of the Google Map. Also, the MapView component comes with several valuable props we are going to add a few of them, but you can find a complete list here.
Let’s create a new folder inside the src folder named styles; this will be our general styles location that we will add more (./src/styles/index.js)
export const customStyleMap = [
  {
    elementType: "geometry",
    stylers: [
      {
        color: "#242f3e",
      },
    ],
  },
  {
    elementType: "labels.text.fill",
    stylers: [
      {
        color: "#746855",
      },
    ],
  },
  {
    elementType: "labels.text.stroke",
    stylers: [
      {
        color: "#242f3e",
      },
    ],
  },
  {
    featureType: "administrative.locality",
    elementType: "labels.text.fill",
    stylers: [
      {
        color: "#d59563",
      },
    ],
  },
  {
    featureType: "poi",
    elementType: "labels.text.fill",
    stylers: [
      {
        color: "#d59563",
      },
    ],
  },
  {
    featureType: "poi.park",
    elementType: "geometry",
    stylers: [
      {
        color: "#263c3f",
      },
    ],
  },
  {
    featureType: "poi.park",
    elementType: "labels.text.fill",
    stylers: [
      {
        color: "#6b9a76",
      },
    ],
  },
  {
    featureType: "road",
    elementType: "geometry",
    stylers: [
      {
        color: "#38414e",
      },
    ],
  },
  {
    featureType: "road",
    elementType: "geometry.stroke",
    stylers: [
      {
        color: "#212a37",
      },
    ],
  },
  {
    featureType: "road",
    elementType: "labels.text.fill",
    stylers: [
      {
        color: "#9ca5b3",
      },
    ],
  },
  {
    featureType: "road.highway",
    elementType: "geometry",
    stylers: [
      {
        color: "#746855",
      },
    ],
  },
  {
    featureType: "road.highway",
    elementType: "geometry.stroke",
    stylers: [
      {
        color: "#1f2835",
      },
    ],
  },
  {
    featureType: "road.highway",
    elementType: "labels.text.fill",
    stylers: [
      {
        color: "#f3d19c",
      },
    ],
  },
  {
    featureType: "transit",
    elementType: "geometry",
    stylers: [
      {
        color: "#2f3948",
      },
    ],
  },
  {
    featureType: "transit.station",
    elementType: "labels.text.fill",
    stylers: [
      {
        color: "#d59563",
      },
    ],
  },
  {
    featureType: "water",
    elementType: "geometry",
    stylers: [
      {
        color: "#17263c",
      },
    ],
  },
  {
    featureType: "water",
    elementType: "labels.text.fill",
    stylers: [
      {
        color: "#515c6d",
      },
    ],
  },
  {
    featureType: "water",
    elementType: "labels.text.stroke",
    stylers: [
      {
        color: "#17263c",
      },
    ],
  },
]
Now, let’s create more folders inside src. Next will be the screens folder where we’re going to make our first screen named UserScreen.js. Inside UserScreen, we will move the content of our App.js. (./src/screens/UserScreen.js)
/**
 1. Copy and paste code from App.js
 2. Rename component name from App to UserScreen
 */

import React, { useEffect, useState } from "react"
import { SafeAreaView, StatusBar, StyleSheet } from "react-native"
import MapView, { PROVIDER_GOOGLE } from "react-native-maps"
import { check, request, PERMISSIONS, RESULTS } from "react-native-permissions"
import Geolocation from "react-native-geolocation-service"

const UserScreen = () => {
  const [location, setLocation] = useState(null)

  const handleLocationPermission = async () => {
    let permissionCheck = ""
    if (Platform.OS === "ios") {
      permissionCheck = await check(PERMISSIONS.IOS.LOCATION_WHEN_IN_USE)

      if (permissionCheck === RESULTS.DENIED) {
        const permissionRequest = await request(
          PERMISSIONS.IOS.LOCATION_WHEN_IN_USE
        )
        permissionRequest === RESULTS.GRANTED
          ? console.warn("Location permission granted.")
          : console.warn("Location perrmission denied.")
      }
    }

    if (Platform.OS === "android") {
      permissionCheck = await check(PERMISSIONS.ANDROID.ACCESS_FINE_LOCATION)

      if (permissionCheck === RESULTS.DENIED) {
        const permissionRequest = await request(
          PERMISSIONS.ANDROID.ACCESS_FINE_LOCATION
        )
        permissionRequest === RESULTS.GRANTED
          ? console.warn("Location permission granted.")
          : console.warn("Location perrmission denied.")
      }
    }
  }

  useEffect(() => {
    handleLocationPermission()
  }, [])

  useEffect(() => {
    Geolocation.getCurrentPosition(
      position => {
        const { latitude, longitude } = position.coords
        setLocation({ latitude, longitude })
      },
      error => {
        console.log(error.code, error.message)
      },
      { enableHighAccuracy: true, timeout: 15000, maximumAge: 10000 }
    )
  }, [])

  return (
    <SafeAreaView style={styles.container}>
      <StatusBar barStyle="dark-content" />
      {location && (
        <MapView
          style={styles.map}
          provider={PROVIDER_GOOGLE}
          initialRegion={{
            latitude: location.latitude,
            longitude: location.longitude,
            latitudeDelta: 0.0922,
            longitudeDelta: 0.0421,
          }}
          showsUserLocation={true}
        />
      )}
    </SafeAreaView>
  )
}

const styles = StyleSheet.create({
  container: {
    ...StyleSheet.absoluteFillObject,
    alignItems: "center",
  },
  map: {
    ...StyleSheet.absoluteFillObject,
  },
})

export default UserScreen
After that, our App.js component no longer will have the above code. Instead, we’re going to import the <UserScreen /> component and render that. We will use React Navigation inside App.js to handle all the screens of our app in the future.
/**
For now just import and render <UserScreen />
*/
import React from "react"
import UserScreen from "./screens/UserScreen"
const App = () => {
return <UserScreen />
}
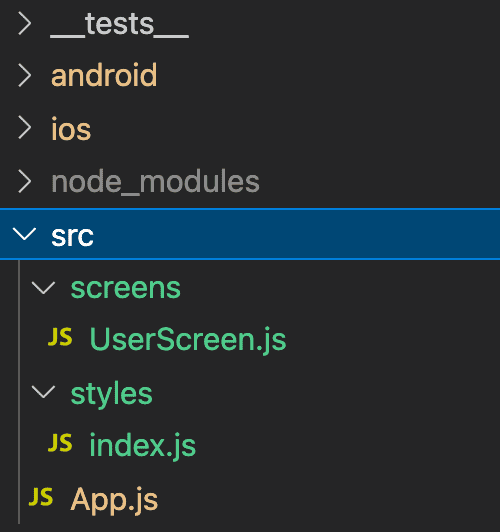
export default AppThis is how should look our folders directory.
Finally, let’s use our customMapStyle and other props into MapView on UserScreen.js
...
import {customStyleMap} from '../styles'; // 👈

const UserScreen = () => {
  ...

  return (
    <SafeAreaView style={styles.container}>
      <StatusBar barStyle="dark-content" />
      {location && (
        <MapView
          ...
          customMapStyle={customStyleMap} // 👈
          paddingAdjustmentBehavior="automatic" // 👈
          showsMyLocationButton={true} // 👈
          showsBuildings={true} // 👈
          maxZoomLevel={17.5} // 👈
          loadingEnabled={true} // 👈
          loadingIndicatorColor="#fcb103" // 👈
          loadingBackgroundColor="#242f3e" // 👈
        />
      )}
    </SafeAreaView>
  );
};

...

export default UserScreen;
Our Map new look! 😍
Unit Test
It’s Tests time! 😍
We are going to dive into our first test case for the <UserScreen /> component and we’re goin to use:
So, lets install React Testing Library Native
npm install --save-dev @testing-library/react-nativeAlso, lets install additional jest matchers:
npm install --save-dev @testing-library/jest-nativeThen automatically add it to your jest tests by using setupFilesAfterEnv option in your Jest configuration (it’s usually located either in package.json under “jest” key or in a jest.config.json file):
// package.json
"jest": {
    "preset": "react-native",
    // 👇
    "setupFilesAfterEnv": [
      "@testing-library/jest-native/extend-expect"
    ]
  }
Now, we’re using a couple of libraries like Geolocation, react-native-permissions and MapView components we need to create mocks of those components/libraries. For that, let’s make a file named jest-setup.js in the root of your app. For now, we will only import jest.
// ./jest-setup.js
import { jest } from "@jest/globals"
Alright, alright, let’s create our first test for the <UserScreen /> component. For that, inside src/screens, create __tests__ (double underscore, both sides) folder. Inside create the file named UserScreen.test.js.
// ./src/screens/__tests__/UserScreen.test.js

import React from "react"
import { render, waitFor } from "@testing-library/react-native"
import UserScreen from "../UserScreen"

describe("<UserScreen />", () => {
  test("should renders MapView and Marker with user current location", () => {
    render(<UserScreen />)
  })
})
Now, what happens if we try to run the test command that we already have in the package.json file?
npm run testAfter running the test command, you will notice that Jest tried to run the two tests files we have. That command will run All the test files we defined in our app. We already have one test by default, and that comes from App.js file. The second test is the one that we write above.
Also, you will see that the test failed! 😱
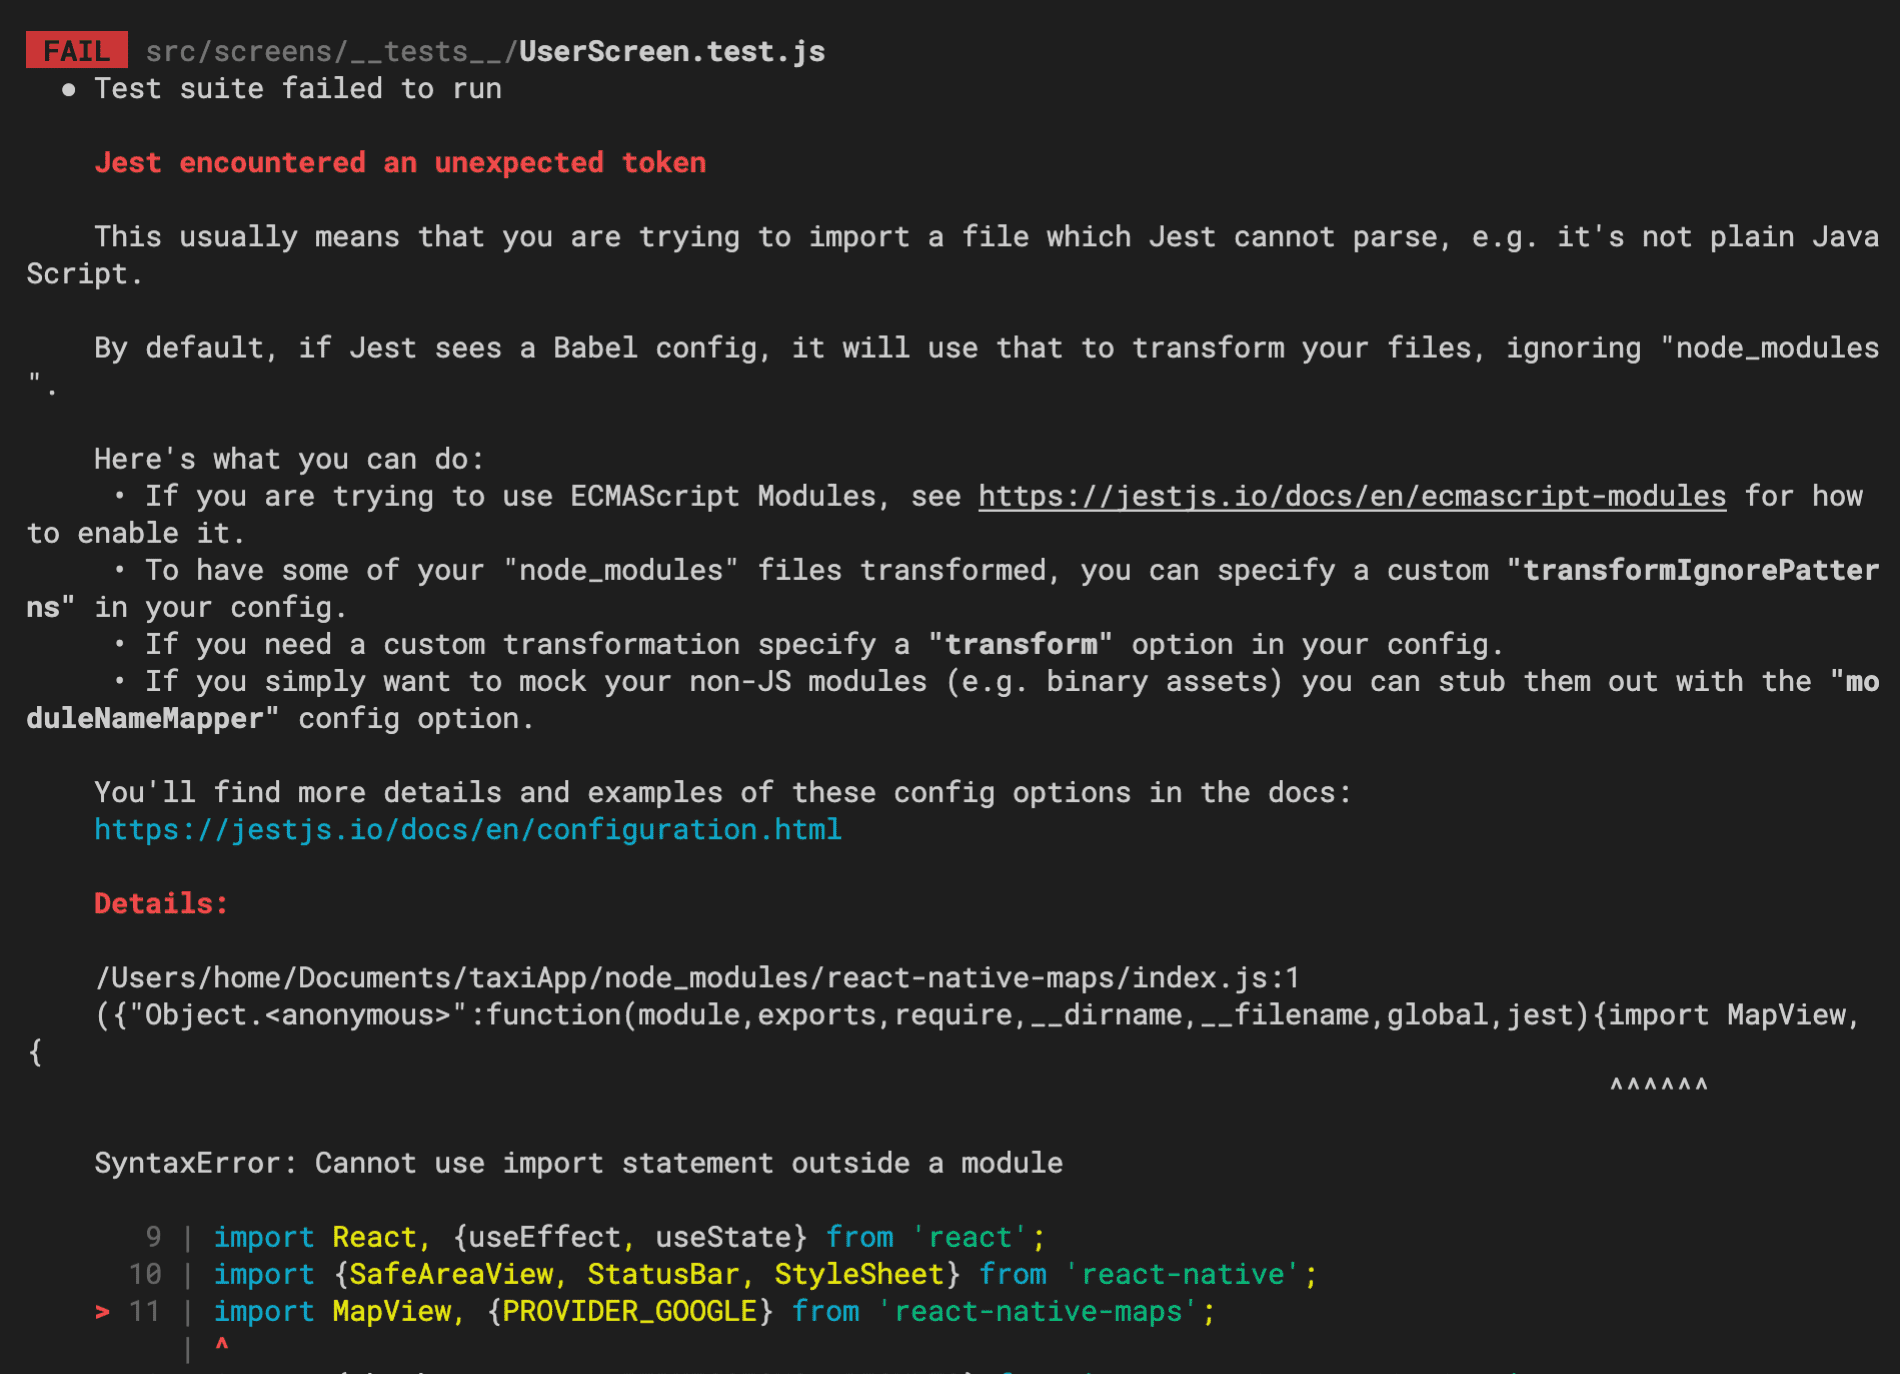
The test failed, and it’s completely normal. You can see that the issue was that Jest tried to import MapView component from react-native-maps library for the UserScreen.test.js file and it failed. That’s why we need to mock react-native-maps so our test can pass.
Let’s do that! 💪
Open the jest-setup.js file and mock react-native-maps.
jest.mock("react-native-maps", () => {
  const React = require("react")
  const { View } = require("react-native")
  class MockMapView extends React.Component {
    render() {
      const { testID, children, ...props } = this.props

      return (
        <View
          {...{
            ...props,
            testID,
          }}
        >
          {children}
        </View>
      )
    }
  }

  const mockMapTypes = {
    STANDARD: 0,
    SATELLITE: 1,
    HYBRID: 2,
    TERRAIN: 3,
    NONE: 4,
    MUTEDSTANDARD: 5,
  }

  return {
    __esModule: true,
    default: MockMapView,
    MAP_TYPES: mockMapTypes,
    PROVIDER_DEFAULT: "default",
    PROVIDER_GOOGLE: "google",
  }
})
We created a mock for react-native-maps. We used a React Class component, mostly because I had an issue when used a Function Component. Perhaps you could try that instead of a class. We grab whatever props our MapView component could have and also whatever content we pass as children. Lastly, we return MockMapView as default import because when we import MapView from react-native-maps you can see it is a default export.
Next, we need to tell Jest that we have a setupFiles for our tests. We do that inside our jest section on package.json.
"jest": {
    "preset": "react-native",
    "setupFilesAfterEnv": [
      "@testing-library/jest-native/extend-expect"
    ],
    // 👇
    "setupFiles": [
      "./jest-setup.js"
    ]
  }
Try to run the test command again
npm run testAnd… It fail!
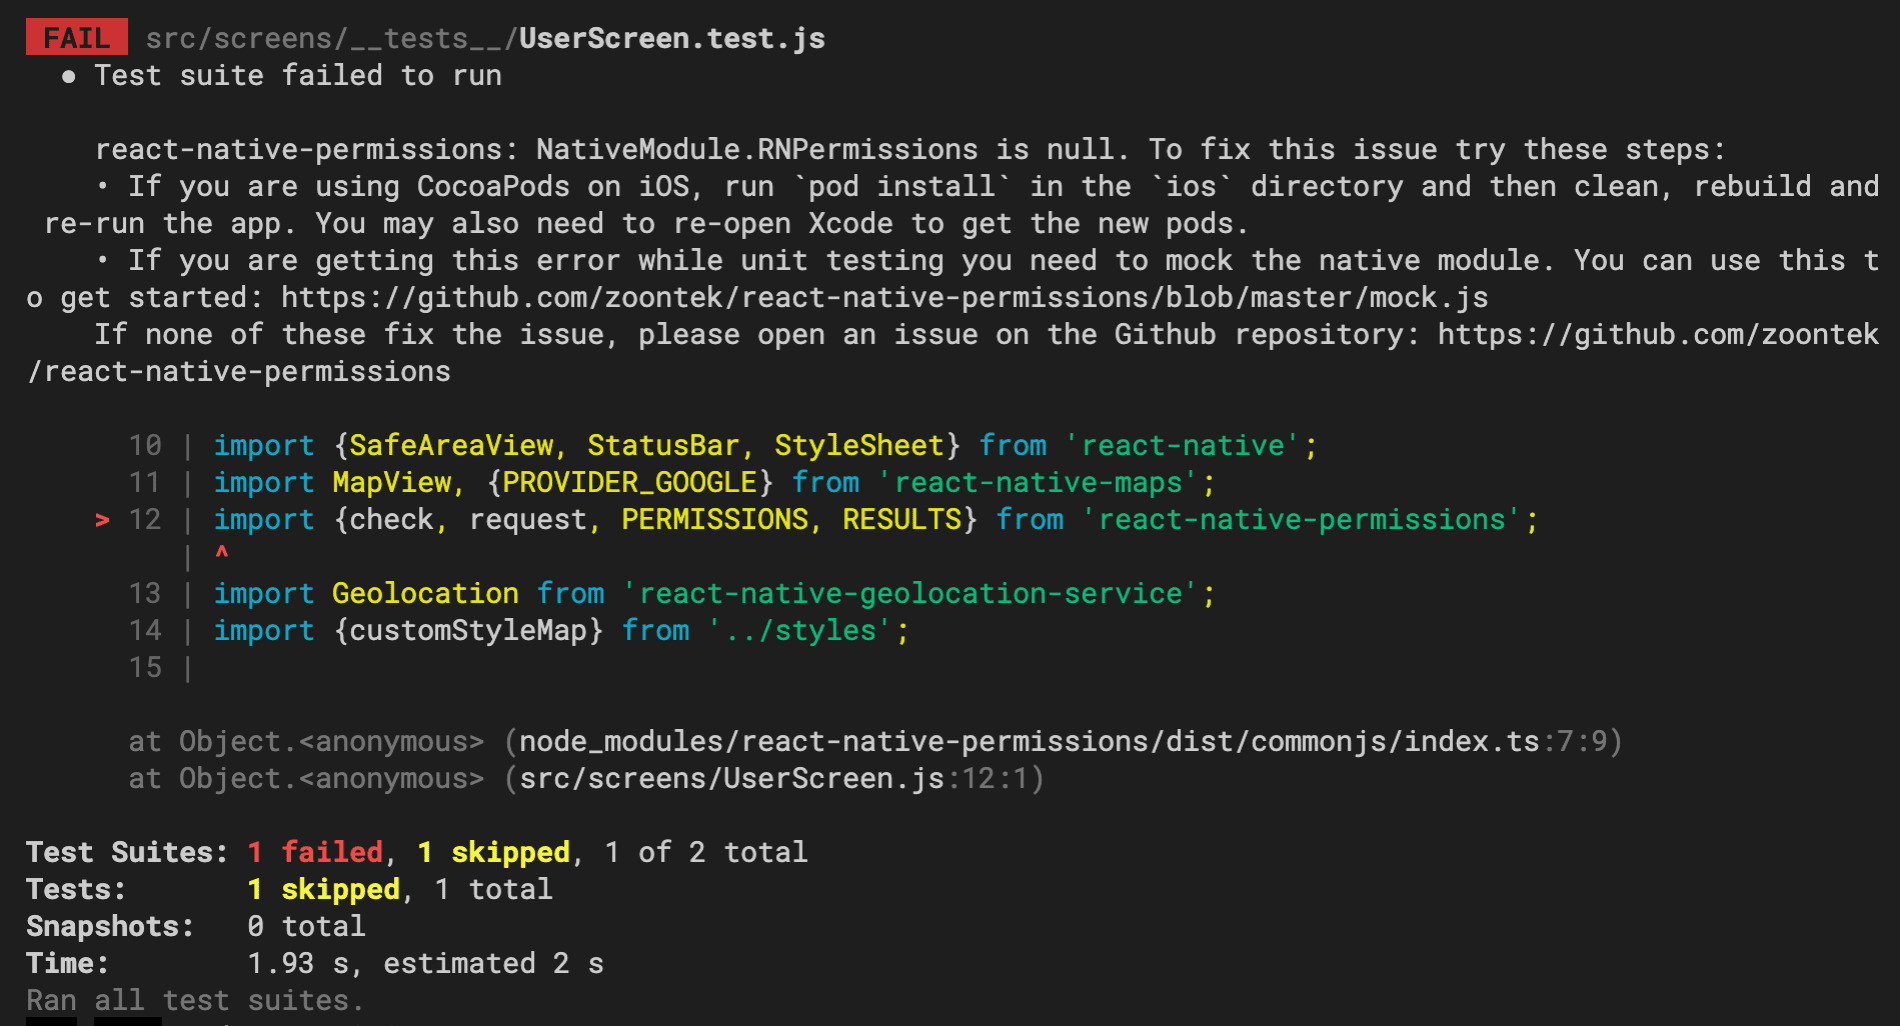
This time atleast isn’t failing on MapView. This time is failing because of react-native-permissions. And it’s because we haven’t mock that one yet.
Let’s do that! 💪
Go back to jest-setup.js and add this:
jest.mock("react-native-permissions", () =>
  require("react-native-permissions/mock")
)
If for some reasons you still have issues regarding export {PERMISSIONS, RESULT} then you could try to fix adding transformIgnorePatterns to your Jest config inside package.json
 "transformIgnorePatterns": [
      "node_modules/(?!(jest-)?react-native-permissions|)" // See I added react-native-permissions
    ],
There is one last mock that we’re missing, and that is Geolocation. Instead of mocking inside our jest-setup.js file, let’s create a mocks folder at the root of our project. Inside the mocks folder, add the name of the library react-native-geolocation-service.js. It has to be the same name.
// ./__mocks__/react-native-geolocation-service.js
export default {
getCurrentPosition: jest.fn().mockImplementation(successCallback => {
const position = {
coords: {
latitude: 57.7,
longitude: 11.93,
},
}
successCallback(position)
}),
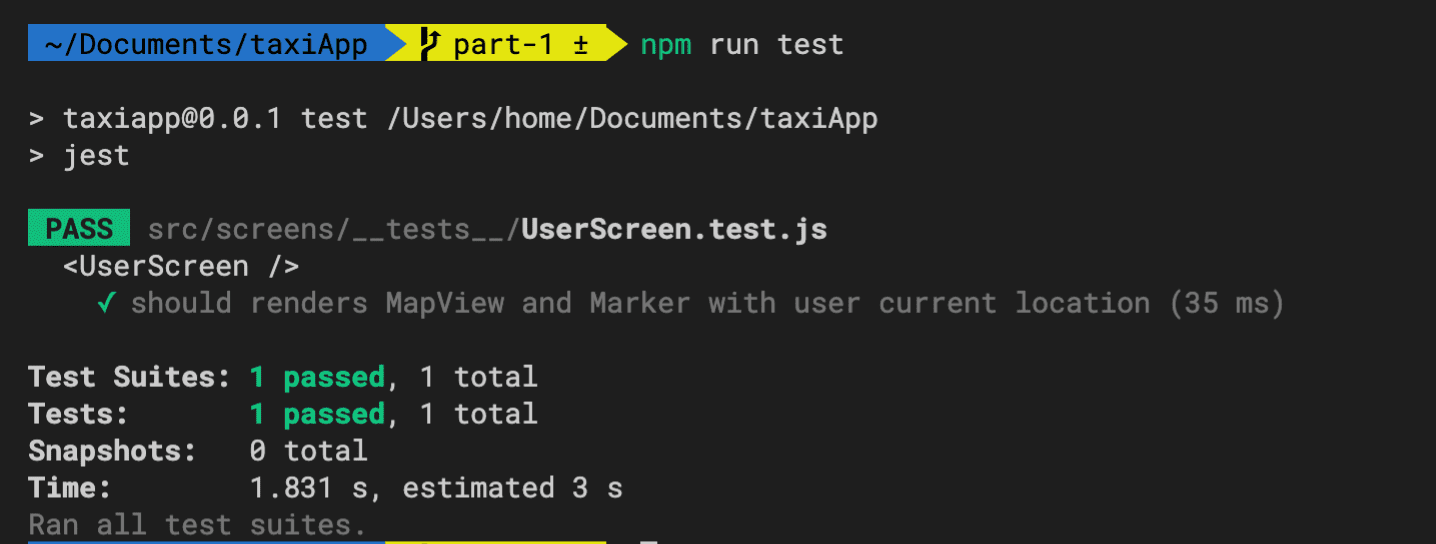
}Phew, I think we finished mocking our libraries/components from external packages. It is time to rerun the test, but we can remove the __tests__/App.test.js file. We don’t go to test App.js for now. We‘re focusing on src/screens/__tests__/UserScreen.test.js.
npm run testAnd… it should PASS!!
We only tested that the UserScreen component renders. Let’s increase our code coverage by testing if the Map is rendered and called for location permissions.
// src/screens/__tests__/UserScreen.test.js
import React from "react"
import { render, waitFor } from "@testing-library/react-native"
import UserScreen from "../UserScreen"
import { check } from "react-native-permissions"
import Geolocation from "react-native-geolocation-service"

describe("<UserScreen />", () => {
  test("should renders MapView and Marker with user current location", async () => {
    render(<UserScreen />)

    await waitFor(() => {
      expect(check).toHaveBeenCalledTimes(1)
      expect(Geolocation.getCurrentPosition).toHaveBeenCalledTimes(1)
    })
  })
})
We can safely import the check function from our mocked react-native-permissions library. Same for Geolocation. We use async/await and waitFor from React Testing Library Native because when component mount, we check for permissions first. Second, we call the current user location. Then we update the state with setLocation({latitude, longitude}). So, there’re a couple of things going on, and we have to wait to fulfill those operations.
Let’s add a testID to our MapView component to make sure that the Map is rendered. Open UserScreen component and add a testID.
...

const UserScreen = () => {
  ...

  return (
    <SafeAreaView style={styles.container}>
      <StatusBar barStyle="dark-content" />
      {location && (
        <MapView
          testID="map" // 👈
          ...
        />
      )}
    </SafeAreaView>
  );
};

...
We also need to pass the new testID into our mocked version the MapView component. So open jest-setup.js file and add this:
jest.mock('react-native-maps', () => {
  const React = require('react');
  const {View} = require('react-native');
  class MockMapView extends React.Component {
    render() {
      const {testID, children, ...props} = this.props; // 👈

      return (
        <View
          {...{
            ...props,
            testID, // 👈
          }}>
          {children}
        </View>
      );
    }
  }

...
});
Lets add one last assertion to our UserScreen.test.js file.
import React from "react"
import { render, waitFor } from "@testing-library/react-native"
import UserScreen from "../UserScreen"
import { check } from "react-native-permissions"
import Geolocation from "react-native-geolocation-service"

describe("<UserScreen />", () => {
  test("should renders MapView and Marker with user current location", async () => {
    const { getByTestId } = render(<UserScreen />) // 👈

    await waitFor(() => {
      expect(check).toHaveBeenCalledTimes(1)
      expect(Geolocation.getCurrentPosition).toHaveBeenCalledTimes(1)
      expect(getByTestId("map")).toBeDefined() // 👈
    })
  })
})
We ‘re using React Testing Library Native getByTestId function to assert that the testID its defined.

I write both English & Spanish about different subjects. You can follow me on Twitter