React Native Taxi App. Departure Information.
July 26, 2021
In this tutorial, we will build a Taxi App for both iOS & Android using React Native CLI. Also, we’re going to dive into Unit Testing our entire app using Jest + React Testing Library. We will use AWS with Amplify for authentication, database, and AppSync for GraphQL API for the back-end.
Part 2. Departure Information, Styled Components, Context API & Unit Tests.
Styled Components
As I mentioned in the previous post, we’re going to use Styled Components for our app. I decided to use it instead of StyleSheet objects that default with React Native to have a more elegant look & feel and take advantage of the benefits of using props inside our styles in a dynamic way.
npm install styled-components@5.2.3 --saveDeparture Information
Let’s add more components to our app. This time, we’re going to create a Departure Information component. Start by creating a components folder inside our src folder (src/components/DepartureInformation.js).
import React from "react"
import { Platform } from "react-native"
import styled from "styled-components/native"
const Container = styled.View`
flex: ${({ platform }) => (platform === "ios" ? 1.5 : 2.5)};
background-color: #ffffff;
padding-vertical: 20px;
padding-horizontal: 20px;
`
// flex: 1.5 will give us a bit of space for the Departure Informetion
const Row = styled.View`
flex-direction: row;
align-items: center;
margin-bottom: 10px;
`
const Text = styled.Text`
color: #717171;
font-size: 14px;
margin-left: 5px;
font-weight: 600;
`
const TextBold = styled.Text`
color: #000000;
font-size: 20px;
font-weight: 600;
margin-left: 5px;
`
export default function DepartureInformation() {
return (
<Container platform={Platform.OS}>
<Row>
<Text>Departure address</Text>
</Row>
<Row>
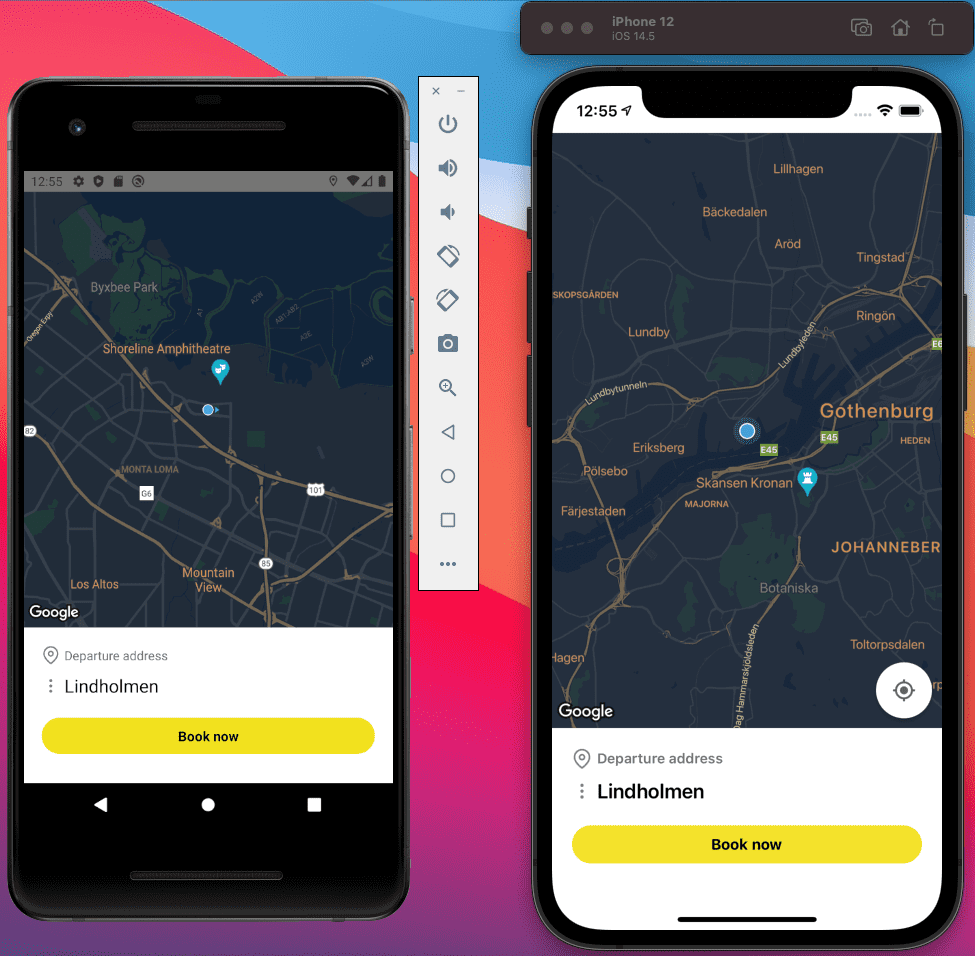
<TextBold>Lindholmen</TextBold>
</Row>
</Container>
)
}We’re creating a couple of Styled Components using the styled object. We’re using a couple of Views and Text to present a more elegant way of structure our codebase style. If you never used Styled Component before, remember that we use back-thicks to wrap the CSS styles that we use for regular websites. Notice that we don’t use React Native default styles naming. For example:
// React Native styling convention
fontSize: 14

// Styled Components use regular CSS naming convention
font-size: 14px;
Another thing. See how for the Container Component, we use a dynamic setting for the flex size. This is one of the advantages of using Styled Components, where we can pass props to the components and dynamically adjust the css.
const Container = styled.View`
  flex: ${({ platform }) => (platform === "ios" ? 1.5 : 2.5)};
  background-color: #ffffff;
  padding-vertical: 20px;
  padding-horizontal: 20px;
`

<Container platform={Platform.OS}>
  ...
</Container>
Now, let’s jump into our UserScreen component, replace StyleSheet with Styled Components, and import the recently created DepartureInformation component.
import React, {useEffect, useState} from 'react';
import {StatusBar, Platform} from 'react-native'; // 👈
import styled from 'styled-components/native'; // 👈
import DepartureInformation from '../components/DepartureInformation'; // 👈
...

// 👇
const Container = styled.SafeAreaView`
  flex: 1;
  background-color: #fff;
`;

// We add flex: 1 in order to grab the entire phone screen and add background-color.

// 👇
const mapContainer = {
  flex: 7,
};

// We add flex: 7 to take most of the screen size for the map

const UserScreen = () => {
  ...

  return (
    <Container>
      <StatusBar barStyle="dark-content" />
      {location && (
        <MapView
          testID="map"
          style={mapContainer} // 👈
          ...
        />
      )}
      <DepartureInformation /> {/*  👈 */}
    </Container>
  );
};

export default UserScreen;
Icons
What’s an app without Icons?. We’re going to use react-native-vector-icons.
npm install --save react-native-vector-iconsYou can follow a more detailed installation guide here. In my case I will go with Cocoa Pods for iOS. You can follow instructions for Android on the link.
Inside Podfile paste the next line:
# React Native Vector Icons
pod 'RNVectorIcons', :path => '../node_modules/react-native-vector-icons'
Now, edit Info.plist file adding the list of fonts you want to use.
<key>UIAppFonts</key>
<array>
  <string>AntDesign.ttf</string>
  <string>Entypo.ttf</string>
  <string>EvilIcons.ttf</string>
  <string>Feather.ttf</string>
  <string>FontAwesome.ttf</string>
  <string>FontAwesome5_Brands.ttf</string>
  <string>FontAwesome5_Regular.ttf</string>
  <string>FontAwesome5_Solid.ttf</string>
  <string>Foundation.ttf</string>
  <string>Ionicons.ttf</string>
  <string>MaterialIcons.ttf</string>
  <string>MaterialCommunityIcons.ttf</string>
  <string>SimpleLineIcons.ttf</string>
  <string>Octicons.ttf</string>
  <string>Zocial.ttf</string>
  <string>Fontisto.ttf</string>
</array>
And run pod install
npx pod-installNow, for Android open ./android/app/build.gradle and add this line:
// React Native Vector Icons
apply from: "../../node_modules/react-native-vector-icons/fonts.gradle"
Have in mind that you probably will need to Compile your app after installing the Fonts, so if you were running the app, then stop and rerun the build command which is npx react-native run-ios or npx react-native run-android.
Now, let’s use the FeatherIcons, you can find a list of Feather Icons here.
...
import FeatherIcon from 'react-native-vector-icons/Feather'; // 👈

...

export default function DepartureInformation() {
  return (
    <Container platform={Platform.OS}>
      <Row>
        <FeatherIcon name="map-pin" size={20} color="gray" /> {/*  👈 */}
        <Text>Departure address</Text>
      </Row>

      <Row>
        <FeatherIcon name="more-vertical" size={20} color="gray" /> {/*  👈 */}
        <TextBold>Lindholmen</TextBold>
      </Row>
    </Container>
  );
}
Now, let’s add a BookNow button to the Departure Information component. This will be a global Styled Component. We’re going to use it on others screens later. So open src/styles/index.js and add the next lines:
import styled from 'styled-components/native';
...

export const BookNow = styled.View`
  flex-direction: row;
  align-items: center;
  flex: 1;
  justify-content: flex-end;
`

export const BookNowButton = styled.TouchableOpacity`
  align-items: center;
  background-color: #f4e22c;
  padding: 10px;
  border-radius: 20px;
  width: 100%;
  margin-left: auto;
`

export const ButtonText = styled.Text`
  font-weight: bold;
  font-size: 15px;
`
After that, we can now import those components into our Departure Information component.
...
// 👇
import {BookNow, BookNowButton, ButtonText} from '../styles';

...

export default function DepartureInformation() {
  return (
    <Container platform={Platform.OS}>
      <Row>
        <FeatherIcon name="map-pin" size={20} color="gray" />
        <Text>Departure address</Text>
      </Row>

      <Row>
        <FeatherIcon name="more-vertical" size={20} color="gray" />
        <TextBold>Lindholmen</TextBold>
      </Row>

     {/* 👇 */}
      <BookNow>
        <BookNowButton
          onPress={() => console.log('pressed')}
          testID="book-now-button">
          <ButtonText>Book now</ButtonText>
        </BookNowButton>
      </BookNow>
    </Container>
  );
}
Final result
Context API
A lot of developers aren’t sure of which option to choose between Redux or Context API. I’m a member of a couple of Facebook Groups about React & React Native, and they always ask about which one to use at least once every week. My response to that is, why don’t you take advantage of both?.
In this case, I’m going to choose Context API. Reasons?
I think it is simpler for this project for now. Perhaps if the app grows, I could think about using Redux, but not for now. Although the awesome thing is that I´m going to use Context API in a Redux way… trust me, it will be fun! 😉
Let’s go!!
First thing first, let’s create a new folder and file inside src (./src/context/PlacesManager.js) and add start with this lines:
// ./src/context/PlacesManager.js
import React from "react"

// initialState where we have currentPlace & destinationPlace.
export const initialState = {
  currentPlace: {
    description: "",
    placeId: "",
    latitude: "",
    longitude: "",
  },
  destinationPlace: {
    description: "",
    placeId: "",
  },
}

// A reducer function to Update our state based on actions.
// Similar to Redux.
export const placeReducer = (prevState, action) => {
  switch (action.type) {
    case "SET_CURRENT_PLACE":
      return {
        ...prevState,
        currentPlace: {
          description: action.description,
          placeId: action.placeId,
          latitude: action.latitude,
          longitude: action.longitude,
        },
      }
  }
}

// We create a context object
export const PlaceContext = React.createContext()

// This is the Context Provider
export const PlaceProvider = ({ children }) => {
  // We add useReducer Hook.
  // Takes a reducer and an initialState as arguments.
  // This return current State and dispatch function.
  const [place, dispatchPlace] = React.useReducer(placeReducer, initialState)

  // We wrapp our components with current State & dispatch function
  return (
    <PlaceContext.Provider value={{ place, dispatchPlace }}>
      {children}
    </PlaceContext.Provider>
  )
}

// This is a custom Hook to consume the created context object.
export const usePlace = () => React.useContext(PlaceContext)
I hope you can follow what we just added above. It’s a lot of information if this is the first time you use Context API. I promise you that you will understand more when we start to use this context. So, let’s add the context provider in our src/App.js file.
// src/App.js
import React from "react"
import UserScreen from "./screens/UserScreen"
// 👇
import { PlaceProvider } from "./context/PlacesManager"

const App = () => {
  return (
    <PlaceProvider>
      <UserScreen />
    </PlaceProvider>
  )
}

export default App
We import PlaceProvider who uses a value prop to inject our current State (place) and dispatch function (disptachPlace) into the children, in this case, our UserScreen provider.
Now, let’s use our first custom Hook inside the Departure Information component to extract the current State from our Context. Open src/components/DepartureInformation.js file.
...
import {usePlace} from '../context/PlacesManager';
...
export default function DepartureInformation() {
// 👇
const {
place: {currentPlace},
} = usePlace();
return (
<Container platform={Platform.OS}>
<Row>
<FeatherIcon name="map-pin" size={20} color="gray" />
<Text>Departure address</Text>
</Row>
<Row>
<FeatherIcon name="more-vertical" size={20} color="gray" />
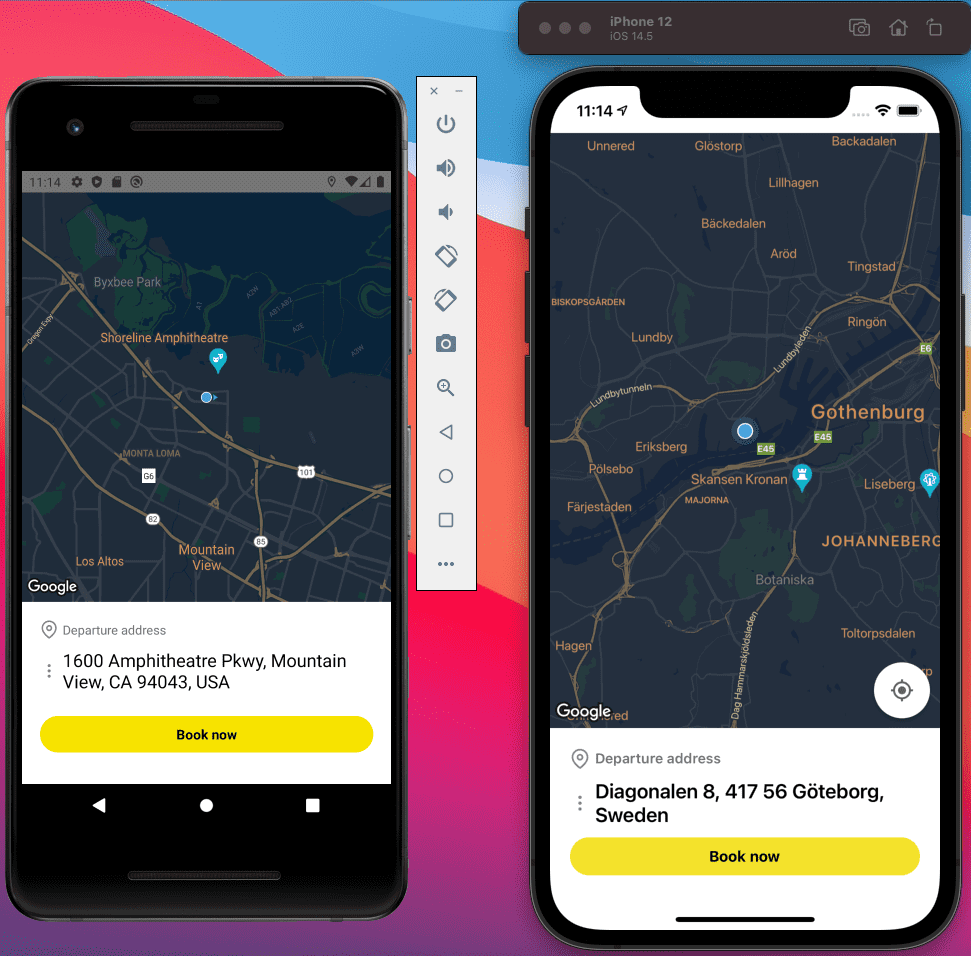
<TextBold>{currentPlace.description}</TextBold> {/* 👈 */}
</Row>
<BookNow>
<BookNowButton
onPress={() => console.log('pressed')}
testID="book-now-button">
<ButtonText>Book now</ButtonText>
</BookNowButton>
</BookNow>
</Container>
);
}Using the power of custom Hooks introduced by React, we consume the value passed to the Context API provider. We destructure the object place to select the currentPlace object.
const {
  place: { currentPlace },
} = usePlace()
Also, we use the currentPlace.description in our component which his initialState is empty for now. Let’s fix that by using Geocoding from react-native-geocoding.
Geocoding
On their website you will read this: A geocoding module for React Native to transform a description of a location (i.e. street address, town name, etc.) into geographic coordinates (i.e. latitude and longitude) and vice versa.
This module uses Google Maps Geocoding API and requires an API key for purposes of quota management. Go to Google Console inside your project and add Geocoding API.

Installation
npm install --save react-native-geocoding@0.5.0Let’s create a constants file inside src/utils/constants.js where we will define our GOOGLE_MAPS_API_KEY. This will be for testing purposes only. It is recommended to use an environment variable for production instead.
export const GOOGLE_MAPS_API_KEY = "YOUR_GOOGLE_MAP_APKI_KEY"We will use Geocoding inside our UserScreen component, where we fetch the User Current Location. From there, we’ll dispatch an action to SET_CURRENT_PLACE. Remember our reducer function where we defined that action?
// src/context/PlacesManager.js
export const placeReducer = (prevState, action) => {
  switch (action.type) {
    case "SET_CURRENT_PLACE":
      return {
        ...prevState,
        currentPlace: {
          description: action.description,
          placeId: action.placeId,
          latitude: action.latitude,
          longitude: action.longitude,
        },
      }
  }
}
Open UserScreen component. Import Geocoder and usePlace custom Hook and update the Geolocation useEffect we already have to fetch Geocoder’s current position. Just read the comments inside the code below to have a better understanding of what is going on.
// Let's import Geocoder and usePlace custom Hook
...
import Geocoder from 'react-native-geocoding';
import {usePlace} from '../context/PlacesManager';
import {GOOGLE_MAPS_API_KEY} from '../utils/constants';

// Geocoder has an init method that required your YOUR_GOOGLE_MAPS_API_KEY.
Geocoder.init(GOOGLE_MAPS_API_KEY, {language: 'en'});
...

const UserScreen = () => {
  ...
  // Destructure current State & dispatch function for the reducer.
  const {place, dispatchPlace} = usePlace();
  ...

  useEffect(() => {
    Geolocation.getCurrentPosition(
      position => {
        const {latitude, longitude} = position.coords;
        // 👇
        // We use Geocoder.from function to pass our current location.
        Geocoder.from({
          latitude: latitude,
          longitude: longitude,
        }).then(res => {
          // Destructure the response
          const {
            formatted_address,
            place_id,
            geometry: {
              location: {lat, lng},
            },
          } = res.results[0];
          // Update current location
          setLocation({latitude, longitude});
          // Dispatch action to SET_CURRENT_PLACE
          // This will update our place Context API.
          dispatchPlace({
            type: 'SET_CURRENT_PLACE',
            description: formatted_address,
            placeId: place_id,
            latitude: lat,
            longitude: lng,
          });
        });
      },
      error => {
        console.log(error.code, error.message);
      },
      {enableHighAccuracy: true, timeout: 15000, maximumAge: 10000},
    );
  }, [dispatchPlace]); // 👈
  // Add dispatch function as a dependency of useEffect

  return (
    <Container>
      ...
    </Container>
  );
};

export default UserScreen;
Boom!💥
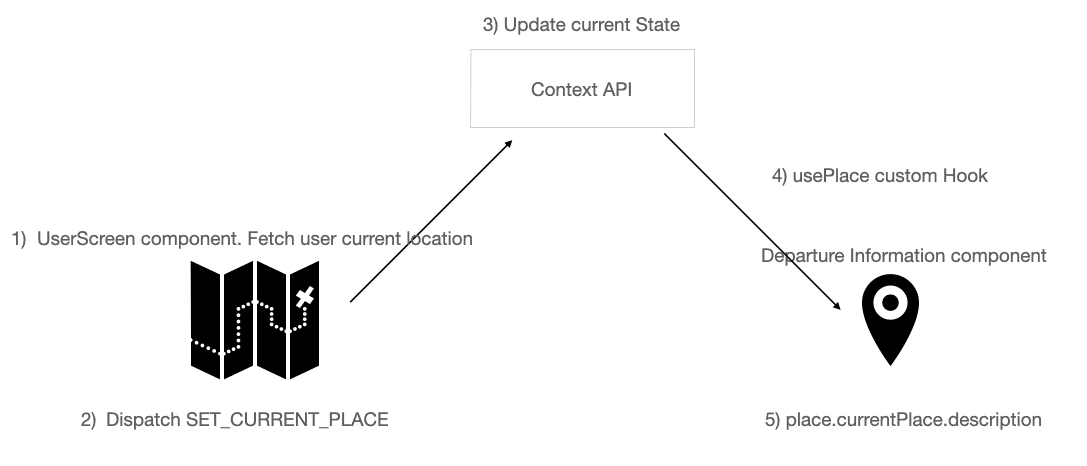
What just happened?.
I will try to explain using a diagram of what just happened.
- Fetch current user location with Geocoding
- Grab current location latitude & longitude and pass to Geocoder.
- Fetch location coordinates and return Google Maps location name, place_id, and lat, lng.
- Update current location using UserScreen local state.
- Dispatch current location to Context API to update state.
- The departure Information component receives currentPlace information and prints it to the screen.
Next, let’s create a new folder inside src called utils (./src/utils/index.js). Here we will place utility functions that will share among other components.
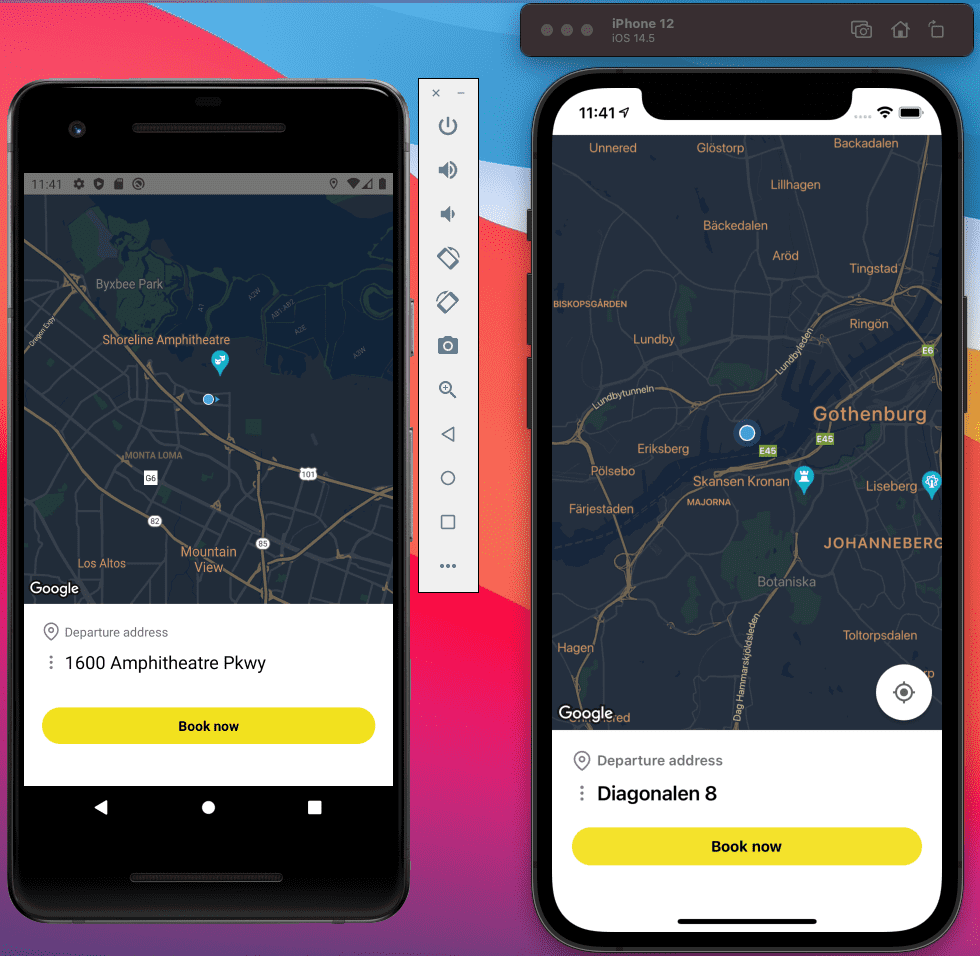
// This function will shorten the currentPlace description name
export const formatPlaceName = placeName => placeName && placeName.split(",")[0]
Let’s use it inside DepartureInformation component.
...
import {formatPlaceName} from '../utils';
...

export default function DepartureInformation({toggleShowBookingViews}) {
  const {
    place: {currentPlace},
  } = usePlace();

  return (
    <Container platform={Platform.OS}>
      <Location>
        <FeatherIcon name="map-pin" size={20} color="gray" />
        <LocationPlaceholder>Departure address</LocationPlaceholder>
      </Location>

      <Location>
        <FeatherIcon name="more-vertical" size={20} color="gray" />
        <LocationBold>{formatPlaceName(currentPlace.description)}</LocationBold>
      </Location>

      <BookNow>
        <BookNowButton
          onPress={toggleShowBookingViews}
          testID="book-now-button">
          <ButtonText>Book now</ButtonText>
        </BookNowButton>
      </BookNow>
    </Container>
  );
}
Unit Tests
It’s Tests time! 😍
We made a couple of updates to our UserScreen component. If you rerun the tests, they will fail. By the way, you can run a specific test using jest.
jest src/screens/__tests__/UserScreen.test.jsPerhaps, you have to install the jest package globally on your computer to make it work. Refer to Jest documentation on how to do that here.
After I run jest src/screens/__tests__/UserScreen.test.js this was the result:
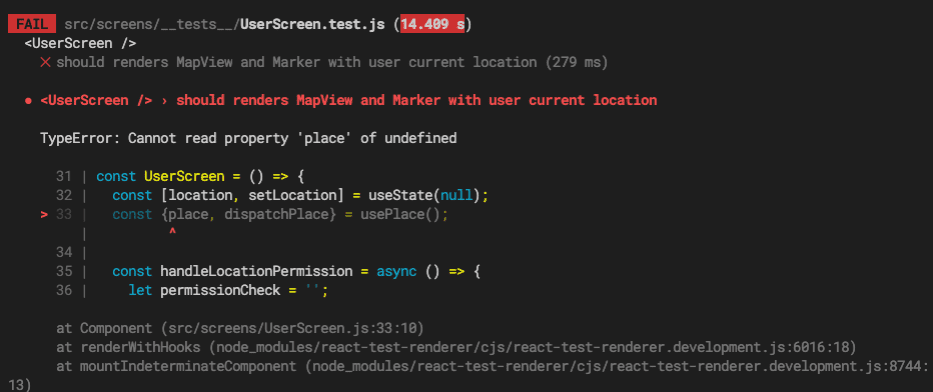
Yup, we have to add place & dispatchPlace into our UserScreen test. We need to mock <PlaceContext.Provider> from our Context API.
Open src/screens/__tests__/UserScreen.test.js:
...
// Import PlaceContext
import {PlaceContext} from '../../context/PlacesManager';

describe('<UserScreen />', () => {
  // Mock a place object
  const place = {
    currentPlace: {
      description: 'Keillers Park',
      placeId: 'abc',
      latitude: 57.7,
      longitude: 11.93,
    },
  };
  // Mock dispatchPlace function
  const dispatchPlace = jest.fn();
  test('should renders MapView and Marker with user current location', async () => {
    const {getByTestId} = render(
      // This is how we mock Context API
      <PlaceContext.Provider value={{place, dispatchPlace}}>
        <UserScreen />
      </PlaceContext.Provider>,
    );

    await waitFor(() => {
      expect(check).toHaveBeenCalledTimes(1);
      expect(Geolocation.getCurrentPosition).toHaveBeenCalledTimes(1);
      expect(getByTestId('map')).toBeDefined();
    });
  });
});
If we rerun the test, it will still fail, but not on the place & dispatchPlace, instead will fail probably because we now use Geocoder inside our useEffect. So, let’s try to mock the Geocoder package too.
Inside our __mocks__ folder, create a file called react-native-geocoding.js:
// ./__mocks__/react-native-geocoding.js
export default {
  init: jest.fn(),
  from: jest.fn().mockImplementation(() => {
    const position = {
      results: [
        {
          formatted_address: "Lindholmen",
          place_id: "abc",
          geometry: {
            location: { lat: 57.7, lng: 11.93 },
          },
        },
      ],
    }
    return Promise.resolve(position)
  }),
}
We’re mocking the two functions we’re using from Geocoder, init, to initialize the map API key and from.
Let’s rerun the test. It should pass!:
jest src/screens/__tests__/UserScreen.test.js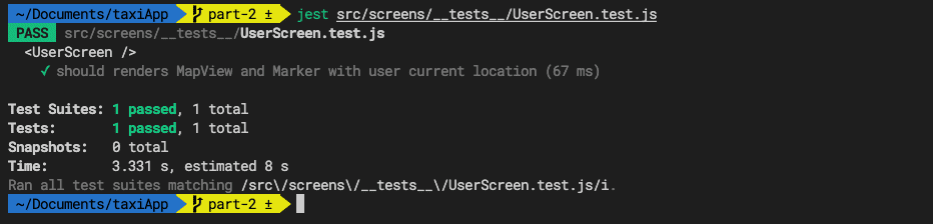
To increase the tests coverage, let’s import Geocoder in our test file too.
// src/screens/__tests__/UserScreen.test.js
...
import Geocoder from 'react-native-geocoding';
describe('<UserScreen />', () => {
const place = {
currentPlace: {
description: 'Keillers Park',
placeId: 'abc',
latitude: 57.7,
longitude: 11.93,
},
};
const dispatchPlace = jest.fn();
test('should renders MapView and Marker with user current location', async () => {
const {getByTestId} = render(
<PlaceContext.Provider value={{place, dispatchPlace}}>
<UserScreen />
</PlaceContext.Provider>,
);
await waitFor(() => {
expect(check).toHaveBeenCalledTimes(1);
expect(Geolocation.getCurrentPosition).toHaveBeenCalledTimes(1);
// Here. Add this line.
// We're testing that Geocoder.from was called.
// We also test the location from ./__mocks__/react-native-geocoding.js
expect(Geocoder.from).toHaveBeenCalledWith({
latitude: 57.7,
longitude: 11.93,
});
expect(getByTestId('map')).toBeDefined();
});
});
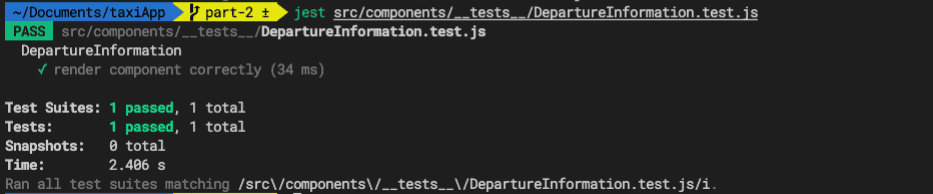
});And that’s for now for the UserScreen.test.js file. Let’s move on and create another test file but this time for the DepartureInformation component.
// Inside src/components/__tests__/DepartureInformation.test.js
import React from "react"
import { render } from "@testing-library/react-native"
import DepartureInformation from "../DepartureInformation"
import { PlaceContext } from "../../context/PlacesManager"

describe("DepartureInformation", () => {
  test("render component correctly", () => {
    const place = {
      currentPlace: {
        description: "Keillers Park",
        placeId: "abc",
      },
    }
    const dispatchPlace = jest.fn()
    const { getByTestId, getByText } = render(
      <PlaceContext.Provider value={{ place, dispatchPlace }}>
        <DepartureInformation />
      </PlaceContext.Provider>
    )

    expect(getByText("Departure address")).toBeDefined()
    expect(getByText("Keillers Park")).toBeDefined()
    expect(getByTestId("book-now-button")).toBeDefined()
  })
})
Here we have to mock <PlaceContext.Provider> again and then using getByTestId, getByText we assert if those components are defined in the tests screen.
Check how we’re testing the Departure address title, the Keillers Park place we mocked on the place object, and finally the Book Now yellow button using the testID we have inside the DepartureInformation component.

I write both English & Spanish about different subjects. You can follow me on Twitter